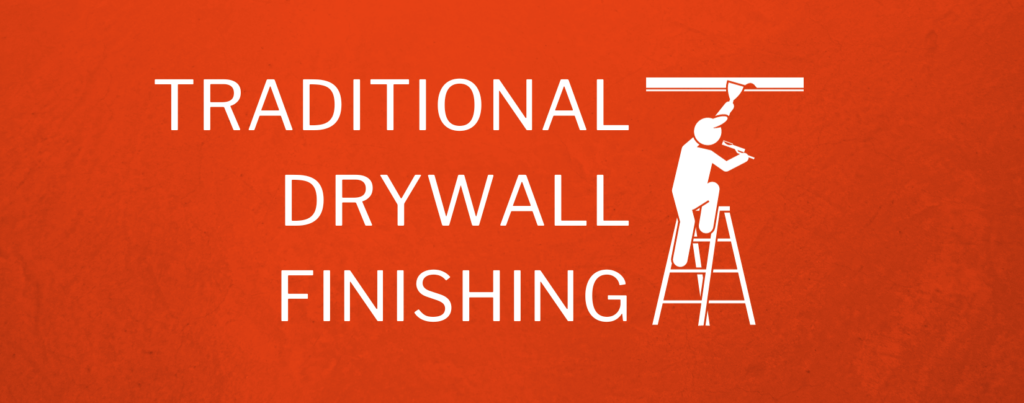
Drywall finishing can be challenging when you don’t have the best tool for the job.
Manually finishing drywall, while possible, comes with several potential issues. These include being labour-intensive, time-consuming, messy and inadequate for large jobs or hard to reach areas.
There are some tools that try to overcome these limitations, such as corner application boxes.
Corner boxes are a popular choice for finishing drywall. However, they rely on manually applied pressure, which can lead to an inconsistent finish and unnecessary strain on the upper body.
Level 5 MiniShot
Level 5, the producers of premium automatic taping tools, created the MiniShot to combat the drawbacks of outdated drywall finishing methods.
The Level 5 MiniShot is a drywall finishing tool comprising of an oversized, clear, polycarbonate chamber for the compound. With a gas cylinder to effortlessly push the compound out of your chosen finishing head. An extender can also be added to the tool to maximise reach.
Read on to learn more about why the Level 5 MiniShot is the ideal tool for your drywall finishing projects.
Benefits of the Level 5 MiniShot
Simplicity
Using the Level 5 MiniShot for finishing plaster is second to none when it comes to simplicity.
Push your chosen finishing head against the wall with minimal pressure to begin the flow of compound, without the need for twisting.
Once you’ve finished application to that section, simply release pressure to halt the compound release.
Additional Reach
The Level 5 MiniShot is 45.5 inches long and compatible with an 18-inch extender. The additional reach provided by this tool means that you can finish high walls and ceilings with ease.
With the extender applied, you maximise your reach to 63.5 inches. Negating the need for hop ups or stilts and reducing the time spent working at height whilst out on a job.
Without the extender attached, this lightweight tool can be used to finish drywall in tight spaces, such as cupboards and pantries, making it perfect for every project.
Reduced Strain
The no twist application and additional reach provided by the Level 5 MiniShot minimises strain to the upper body of both left and right handed plasterers.
With this lightweight tool, your back, shoulders and wrists can be comfortable, even when working for extended periods of time.
Flow Adjustment
You can control release of the finishing compound directly on the Mini Shot using the flow adjustment nut.
This flow adjustment allows you to have complete control over the release of compound, no matter the consistency of compound mixture or the pressure applied to the wall.
Powerful Flow
The back pressure provided by the gas cylinder creates a powerful flow of compound. Applying a range of mixtures is light work for the MiniShot’s gas cylinders, no matter how thick the compound.
Consistent Flow
The gas cylinder works in tandem with the flow adjustment settings to provide a consistent flow of finishing compound.
This means that you can finish drywall with high precision and get the same optimal result for every aspect of your project.
High Capacity
The Level 5 MiniShot also saves you taking unnecessary trips back to the pump.
The high capacity composite chamber means you can spend more time working and less time filling up your equipment.
Additionally, the clear chamber means you always know how much compound you have remaining – so there are no surprises when it comes to needing to head back to the pump.
Easy Cleaning
Cleaning the MiniShot is exceptionally easy – no disassembly required.
Featured on the MiniShot is a cleaning nozzle, attachable to garden hoses. Allowing you to fill the compound tube with water and flush out any leftover compound.
In the event you do want to disassemble your equipment, there are easy-to-use latches around the chamber so you can take apart your tool with ease.
Speed
The Level 5 MiniShot allows you to finish large and complex jobs with outstanding speed.
The simple application, effortless flow adjustment, large capacity and easy cleaning chamber speeds up the finish process.
With less application, mistakes, mess and fill-ups, jobs can be completed quickly in comparison to traditional finishing methods.
Multiple Finishing Applications
The Level 5 MiniShot is a tool suited for every drywall finishing project.
The ball end is made of stainless steel and finishing heads from all leading manufacturers can be attached.
No matter if you’re flat finishing, or looking to finish inside or outside corners, the Level 5 MiniShot can be adapted to fit the needs of any job.
Plus, if you’re upgrading from an older finishing tool, such as a corner box, there’s no need to purchase specific finishing heads – reducing the cost and complexity of getting the MiniShot onto your next project.
The Level 5 MiniShot Summarised
The Level 5 MiniShot is an essential tool for professional drywallers and astute DIYers alike.
Manually finishing drywall and traditional tools such as corner boxes can get the job done, but at a sacrifice compared to the automated, power-assisted MiniShot.
Its simple, lightweight nature and thoroughly considered design mean you can complete more jobs with speed and precision, without unnecessary physical strain.
Browse our range of Level 5 Tools to find the best automatic tool for your next project.
In the world of drywalling, achieving a smooth, seamless, and visually appealing finish is the ultimate goal.
To cover gaps and create a flawless surface, professionals and DIY enthusiasts alike rely on a versatile material known as jointing compound.
In this guide, we will explore the two main types of jointing compound: ready-mixed and powder.
But first, let’s explore what jointing compound is and how it’s used.
1.1. What is a Jointing Compound?
Jointing compound is a material used in the finishing of drywall or plasterboard.
Drywall consists of large panels of gypsum board or plasterboard. Jointing compound is a paste-like substance used on drywall, specifically formulated for filling gaps and finishing corner beads, trims and fasteners.
The end result of applying jointing compound is to repair or improve the appearance of drywall, leaving a smooth, structurally sound surface ready for painting.
1.2. How is Jointing Compound Used?
The application of jointing compound begins with the installation of drywall panels, leaving gaps and joints between them. Once the drywall is installed, the process of application can begin.
First, a fibreglass or paper tape is applied over the joints to reinforce them and prevent any future cracking.
A layer of jointing compound is spread over the taped joints, embedding the tape and filling any depressions or gaps. This coat is typically wider than the tape itself.
Subsequent coats are then applied, each wider than the previous one, to feather the edges and create a smooth, seamless transition between the wall or ceiling and the joints. Each coat is allowed to dry and is sanded before applying the next.
After the compound has dried, it is sanded to achieve a smooth surface. The final coat may involve a thinner application, known as skim coating, to further finesse the finish.
2. Ready Mixed Jointing Compound
As the name suggests, ready mixed jointing compound is a pre-mixed product.
This product conveniently comes ready to use directly from the container, meaning you can start the application straight away.
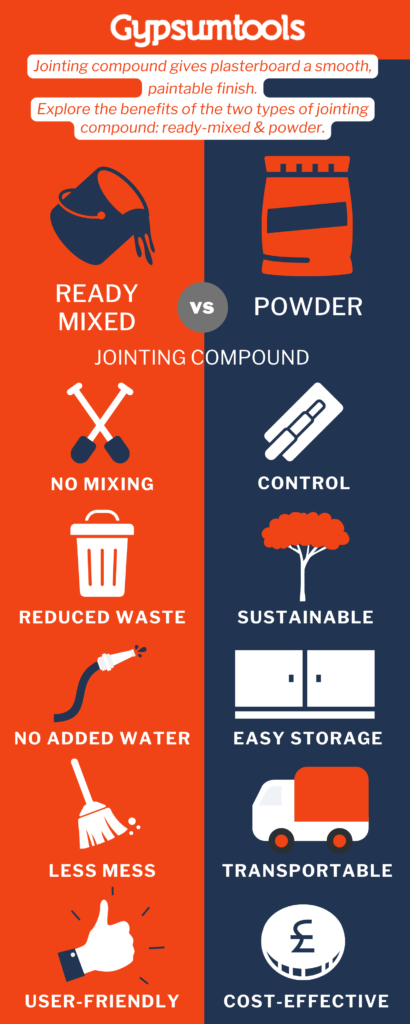
2.1. Benefits of Ready Mixed Jointing Compound
No Mixing
The core benefit of ready-mixed jointing compound is that it doesn’t require mixing. This means you can get to work straight away – cutting out the time and effort needed to create a usable mixture and maximising convenience.
Uniform Consistency
Without the need for mixing, you also don’t need to worry about creating the right consistency. This not only reduces waste from mixing errors, but also means the mixture quality remains consistent across the project.
Drying Time
Another benefit of uniform consistency is that the drying time is the same across the whole project. By knowing how long the coat will take to dry, you are able to plan ahead and work systematically during the application process.
Waste Reduction
There is a reduction in waste when it comes to knowing the amount of usable product you have. By purchasing the material premixed, you can get the right amount for the job, instead of iteratively adding powder and water based on the consistency of the mixture.
No Additional Water
Additionally, premixed jointing compound doesn’t require any additional water to be added. So, if you’re working in an environment where water is not readily available or inconvenient to transport, ready-mixed is a practical solution.
Reduced Mess
Applying jointing compound straight from the container reduces the mess involved in finishing drywall. With ready mixed, the chance of spillages and the time needed to clean is drastically reduced.
User-Friendly
With DIYers in mind, ready mixed jointing compound is incredibly easy to use. When used in combination with drywall tape, the application process is quick and convenient and provides a high quality finish, even for those with minimal experience.
3. Powder Jointing Compound
Powder jointing compound is non-mixed. It is purchased as a white powder, and when mixed with adequate water, forms a paste that can be applied to plasterboard. Mixing the compound can be done either manually, or by attaching a mixing paddle to a drill.
3.1. Benefits of Powder Jointing Compound
Control Consistency
By adjusting the amount of water added, you can control the consistency of the powder mixture. This customization allows you to tailor the compound to diverse project needs, from filling small cracks to creating a smooth finish on joints.
Easy Dry Storage
Since powder jointing compound is stored in a dry, powdered form, it takes up less space and generally has a longer shelf life compared to ready mixed. This means large quantities of dry powder can be neatly stored for extended periods without degrading.
Cost-Effective
Powder jointing compound tends to be cheaper than its ready mixed counterparts. This cost-effectiveness is especially attractive for both budget-conscious individuals and on large-scale projects where cost outweighs convenience.
Transportable
The lightweight nature of powder simplifies transportation, handling, and mixing. This is especially important for professionals who need to carry materials around job sites or DIY enthusiasts who find lighter materials more manageable.
Sustainability
Due to its reduced packaging and light weight, powder jointing compound could be considered to be more environmentally friendly. This is a topical benefit in the construction industry today where sustainability is often a high priority.
4. Should I Use Ready Mixed or Powder?
When it comes to choosing between ready mixed and powder jointing compounds for your project, several important factors come into play.
You should consider your level of experience, budget, the size and complexity of your project and time constraints when deciding whether to use ready mixed or powder.
Level of Experience
Ready mixed compounds are more user friendly and don’t require you to make a usable mixture yourself, making them suitable for individuals with any level of experience.
However, if you’re a professional tradesmen or a skilled DIYer, you may be more appreciative of the ability to customise the consistency of your mixture, making powder jointing compound a better fit.
Budget
While convenient, ready mixed compounds are often more expensive than powder. So where cost is a critical factor, powder jointing compound may be a more suitable option.
Size/Number of Projects
For small-scale projects or quick touch-ups, ready mixed compounds offer convenience and can save time. You may also know exactly how much product you need to complete the job, so to minimise waste, premixed may be more appropriate.
Whereas, the light weight and cost efficiency of powder compounds may provide a stronger appeal when working on large or multiple projects, as it could drastically reduce your material spend and make transporting your supplies easier.
Complexity of Project
Ready mixed compounds are ideal for straightforward, standard drywall projects where simplicity is a priority.
Powder compounds are more suitable for complex projects due to their versatility, allowing you to vary consistencies and extend drying times based on the project needs.
Time Constraints
If you’re working on a tight schedule, ready mixed compounds are a better choice for speed. By cutting out the task of mixing, you can start the application process straight away, making for a faster project time.
5. Advice for Using Ready Mixed Jointing Compound
When working with ready mixed jointing compound there are some key tips to help you achieve high quality results.
Stir Before Use
Before use, stir the compound thoroughly to ensure you get a consistent texture. However, avoid over-stirring, as this can shorten the hardening time and add air bubbles into the mixture.
Stirring only the amount you plan to use within a reasonable timeframe also helps to prevent the mixture from drying out.
Don’t Overwork the Mixture
When applying the compound, resist the temptation to excessively rework it after application. Overworking can lead to a less smooth finish and may cause the compound to lose adhesion and begin cracking or peeling.
Open Time
You need to be aware of the open time of the compound you’re using. Open time refers to the amount of time the premix remains workable before it starts to set.
As the mixture has been pre-made, you can follow the manufacturer’s instructions to ensure you apply the compound within the specified timeframe.
Storage
Finally, if you have spare ready mixed jointing compound, it’s important to know how to store it for use on your next project.
For optimal storage, ensure there is no dried compound that could fall into the mixture, pour half an inch of clean water onto the top of the compound, press the lid on tightly and remember to remove the water before next use.
When stored properly, ready mixed can be usable for up to 9 months.
6. Tips for Using Powder Jointing Compound
To get the best results on your finishing projects, there are some key things to keep in mind when mixing and storing the product.
Mixing
The key to a high-quality finish is a suitable jointing compound consistency. This consistency comes from properly mixing the powder and water.
Start by carefully measuring the required amount of powder and add it to a clean mixing container. Use a mixing paddle or a stir stick to combine the powder with the appropriate amount of water.
Follow the manufacturer’s recommended water-to-powder ratio for the optimum consistency. However it is important to note, adding the water is an iterative process, so add the water incrementally, keeping an eye on the consistency of the mixture.
Ensure you mix thoroughly to achieve a smooth, lump-free paste.
Slaking
After mixing, allow the compound to slake for a few minutes. Slaking allows the powder to absorb the water fully and reach its ideal working consistency.
During this time, you may notice the mixture thickening slightly. Stir it again to maintain the desired consistency before use.
Adjust the Consistency
Check the compound’s consistency after mixing and slaking. If it’s too thick or too thin for your intended application, you can make adjustments.
To thin the jointing compound, add a small amount of water and mix thoroughly. To thicken it, incorporate more powder. Make gradual adjustments and mix well until you achieve the desired result.
Storage
If you have any leftover powder jointing compound, store it correctly to prevent moisture absorption and clumping.
You store mixed powder jointing compound in a similar way to pre-mixed – clean the edges of the container, pour water over the leftover compound and seal the container.
However, when using powder, you may not have a lid for your container, as is often the case with ready-mixed products. In this case, create an airtight seal using something you have to hand, such as plastic wrap.
Dissimilarly to ready-mixed, the storage time, particularly without an airtight lid, is drastically reduced. If you’re not using the remaining product in the next day or two, the leftover compound will become unusable.
The issues associated with storing mixed powder jointing compound highlights the importance of only mixing the estimated amount needed.
7. Summary
This article has explored the respective benefits of ready mixed and powder jointing compounds.
Ready mixed is a premade product, taking out the hassle of mixing. It is quick and easy to use and can save time on cleaning up.
However, it’s important to consider that ready mixed is less cost-effective than its powder counterpart, with open time, overworking and storage needing to be considered when using this product.
These features make ready mixed jointing compound ideal for smaller, simpler projects where time is a critical factor, or for those with limited drywall finishing experience.
Powder jointing compound is ideal for those who want a customizable consistency and to buy in bulk. This is because before mixing, powder jointing compound is cost-effective, lighter in weight, easy to store and boasts a longer shelf life compared to ready mixed.
It’s important to consider the mixing process when choosing the right product. Powder jointing compound requires you to create a usable consistency, and once mixed, the leftovers have a short storage time.
If you’re a plasterer by trade or an apt DIYer working on a large or complex job, powder jointing compound is the ideal solution. Similarly, if you are working on a budget or environmentally conscious project, powder comes out on top.
As discussed, both ready mixed and powder jointing compound have their advantages and considerations. It’s important to weigh these up alongside your personal preferences when deciding which product is best suited to your project.
Once you’ve decided which form of jointing compound is right for you, browse our range of jointing compounds at Gypsum to find the perfect product at a great price.
Welcome to our comprehensive guide on plastering materials – a fundamental resource for any plasterer, whether seasoned professional or budding enthusiast.
This guide will take you on a journey through the vital elements that constitute the world of plastering.
We will start with an in-depth look at the core materials, shedding light on their unique properties and the roles they play in the plastering process.
From there, we’ll guide you through the essential steps of preparing these materials, followed by practical advice on how to put them to good use.
But our exploration won’t stop at the practicalities; we will also delve into the increasingly important topic of sustainable plastering materials, considering how we can make eco-friendlier choices without compromising on quality.
Lastly, we’ll examine the most current industry trends, keeping you at the forefront of plastering innovation.
No matter your level of experience or interest in plastering, this guide aims to enrich your understanding and provide useful insights. Let’s delve into the fascinating world of plastering materials together!
Chapter 1- Core Plastering Materials
In any plastering job, the materials you choose to work with are paramount to achieving a high-quality finish.
They form the base of your project and can greatly affect the durability, appearance, and even the health of your indoor environment.
In this chapter, we’re going to take a closer look at the core materials used in plastering.
1.1 Plaster
Plaster is a versatile building material used for the protective or decorative coating of walls and ceilings.
It’s the most integral part of any plastering job.
Here are the main types you’re likely to come across:
Gypsum Plaster: Also known as plaster of Paris, gypsum plaster is created by heating gypsum to about 300 °F (150 °C). The process eliminates water from the mineral and breaks it down into a fine, white powder.
When water is added, the powder rehydrates, becoming a viscous material that can be easily moulded or spread over a surface.
It’s best suited for interior work, as it doesn’t fare well when exposed to large amounts of water.
Gypsum plaster sets quickly, usually within 30-50 minutes, so work needs to be done swiftly.
Lime Plaster: Lime plaster is a blend of calcium hydroxide (‘slaked lime’) and sand, along with other inert fillers.
The carbon dioxide in the atmosphere reacts with the wet plaster, causing it to harden by transforming the calcium hydroxide into calcium carbonate.
Lime plaster is renowned for its flexibility, breathability, and less brittle nature compared to gypsum, making it great for both interior and exterior applications.
Cement Plaster: Composed of a mixture of suitable plaster, sand, portland cement, and water, cement plaster is popular for its use on exterior surfaces due to its durability and water resistance.
It’s an ideal choice for regions with heavy rainfall or damp conditions.
1.2 Plasterboard
Plasterboard, also known as drywall or wallboard, forms an integral part of modern construction. It’s made by compressing an inner layer of gypsum between two outer layers of heavy paper or fibreglass mat.
Being lightweight and easy to install, it’s commonly used to form interior walls and ceilings.
Moreover, it’s fire-resistant, provides good sound insulation, and acts as a blank canvas for decorative finishes.
1.3 Jointing Tape
Jointing tape is an essential element when working with plasterboard.
It’s used to bridge the joints between sheets of plasterboard, providing a smooth, continuous surface for plastering.
Paper Tape: This type of tape is made from a strong, flexible paper material. It’s embedded in a layer of joint compound to give a seamless finish.
Fibreglass Mesh Tape: Fibreglass mesh tape is a self-adhesive tape that’s quick and easy to apply. However, care must be taken when plastering over it, as improper application can lead to bubbles or blisters appearing on the finished surface.
1.4 Plastering Beads
Plastering beads are thin strips of metal or plastic that are embedded in the plaster to create clean, sharp edges and corners, giving your plasterwork a professional finish.
They also provide structural strength to the plaster.
Angle Beads: These are used to form sharp corners and protect them from damage.
Stop Beads: These create a neat finish at the edges of your plasterwork where it stops or meets another surface.
Bell Beads: Bell beads or arch beads are used for forming curves and arches in plasterwork.
Chapter 2: Preparing Plastering Materials
Whether you’re a seasoned professional or a do-it-yourself enthusiast, you know that success in plastering begins before the first dollop of plaster touches a wall.
It starts with thorough and careful preparation of the materials involved.
From choosing the right type of plaster to prepping the plasterboard and applying PVA, each step has a significant impact on the final outcome.
Let’s dive deeper into this process.
2.1 Preparing Plaster
The cornerstone of any plastering project is, of course, the plaster itself.
And preparing it correctly can be the difference between a smooth, high-quality finish and a job that looks amateurish.
Selecting the Right Plaster: The type of plaster you choose will depend largely on the nature of the project.
For indoor wall finishes, gypsum plaster, or plaster of Paris, is a common choice due to its fine texture and easy workability.
It dries to a hard, smooth surface that can be painted or wallpapered. If you’re working outdoors or in damp environments, you might consider using cement plaster, which has greater water resistance and durability.
Mixing: Mixing the plaster properly is essential.
Typically, you will first pour clean, cold water into a clean mixing bucket. The plaster powder is then added gradually while stirring.
It’s best to use a mechanical plaster mixer or a drill with a mixing paddle to achieve a smooth, lump-free mixture.
Remember to follow the manufacturer’s instructions for the correct water-to-plaster ratio.
Checking the Consistency: Achieving the right consistency is a vital part of the process. The plaster should be mixed to a smooth, creamy consistency – thick enough to spread evenly and stick to your trowel, but thin enough to work comfortably.
2.2 Preparing Plasterboard
Preparing plasterboard, also known as drywall, involves more than just hanging sheets on a wall.
Proper preparation ensures that the final plastered surface is smooth and seamless.
Measuring and Cutting: Begin by measuring the area where the plasterboard will be installed.
Use these measurements to mark the plasterboard, and then cut it using a utility knife or drywall saw.
Always cut on the face side using a sharp blade to ensure clean edges.
Installation: Install the cut plasterboard using drywall screws and a drill, ensuring it is secure and level. The screws should be placed every 12 inches along the edges and every 16 inches in the centre of the board.
Applying Jointing Tape: Once the plasterboard is installed, apply jointing tape over the seams. This helps to prevent cracking and achieves a smooth, seamless finish once the plaster is applied.
2.3 Preparing Plastering Beads
Plastering beads give your plastering project a professional finish. They help create sharp corners and edges and add strength to vulnerable areas.
Measuring and Cutting: Determine the lengths of plastering beads you need for your project, and cut them with tin snips. Always cut on an angle to avoid sharp edges.
Placement and Fixing: Plastering beads should be fixed to the edges and corners where you want a clean, sharp finish. Use plaster or drywall screws to fix them in place.
2.4 Preparing PVA
PVA, or Polyvinyl Acetate, is a clear, adhesive sealer used in plastering to seal the surface before plastering.
Diluting: PVA often needs to be diluted with water before use. Check the manufacturer’s instructions to ensure the correct ratio, often around 1 part PVA to 5 parts water.
Application: Apply the PVA solution to the surface using a brush or roller. Ensure you cover the whole surface and allow it to partially dry (until it’s slightly tacky) before
Chapter 3: Using Plastering Materials
You’ve got your plaster, your tools, and your workspace prepared – now the real fun begins.
This chapter guides you through the process of applying and finishing your plaster, working with plasterboard, incorporating plastering beads, and effectively using PVA in your plastering project.
3.1 Applying Plaster
Applying plaster is an art that requires patience and precision. It’s a multi-step process, each step building on the last to achieve a smooth, flawless finish.
Load Your Hawk: First, scoop some plaster onto your hawk, a handheld flat board that holds the plaster while you’re working. The plaster should be scooped onto the centre of the hawk, ready to be pushed onto your trowel.
Apply the Plaster: Slide some plaster from the hawk onto your trowel, then apply it to the wall or ceiling with a firm, even stroke. Start at one corner and work your way across the surface, maintaining a consistent thickness.
Smooth the Plaster: After the plaster has been applied, go over the area with your trowel held at a slight angle. This helps to smooth out any inconsistencies and remove excess plaster.
Wait and Polish: Allow the plaster to set partially – this typically takes around 20-30 minutes depending on the type of plaster. Once it’s firmed up a bit, use a clean, wet trowel to polish the surface, giving it a smooth, glossy finish.
If you’re applying plaster to larger areas and need an extended setting time, plaster retarders, such as Extratime, are a useful option. Plaster retarder delays the plaster setting, giving you more time to finish the job.
3.2 Finishing Plasterboard
When finishing plasterboard, there are two steps you need to take before deciding whether applying plaster is necessary.
Apply Jointing Compound: With the plasterboard installed and jointing tape applied, it’s time to apply a jointing compound over the tape and any drywall screws. This is done with a taping knife, ensuring the compound fills the seams and covers the screws.
Sanding: After the jointing compound has dried completely, sand it smooth using a fine-grit sandpaper. Be careful not to sand into the tape beneath the compound. The goal is to create a seamless surface that blends smoothly with the rest of the wall or ceiling.
After the application of jointing compound and careful sanding, you may be left with a smooth enough finish to apply paint directly on top, avoiding plaster application. However, if the plasterboard doesn’t have a smooth finish, you may need to skim plaster before painting.
3.3 Using Plastering Beads
Plastering beads, which provide clean, crisp edges and corners, are an essential component of professional-looking plasterwork. However, if you’re using plastering beads with plasterboard and the finish is smooth, a layer of plaster may not be necessary.
Apply Plaster: With the beads securely fixed, apply plaster up to the edge of the bead, making sure to cover any fixing nails or screws. This ensures that the bead becomes part of the finished wall or ceiling.
Smooth and Shape: After the plaster is applied, use your trowel to smooth the plaster and shape it to the edge of the bead. This helps to create a sharp, clean finish.
3.4 Working with PVA
PVA, a sealer used in plastering, requires careful timing to use effectively.
Apply PVA: Once the PVA solution has reached the tacky stage (not fully dry but sticky to the touch), it’s time to apply your plaster. The slightly sticky surface allows the plaster to adhere better, giving a smoother finish.
Plaster Over PVA: Apply your plaster following the methods described above. However, it’s crucial to apply the plaster before the PVA fully dries, so the plaster can properly adhere to the surface.
Finishing Touches: After your plaster has set, check for any imperfections or bumps. If necessary, lightly sand the surface until it is completely smooth and ready for painting or decorating. Always remember, patience and meticulous attention to detail are the keys to a successful plastering project.
Chapter 4: Sustainable Plastering Materials
In the face of increasing environmental concerns, various industries, including construction and plastering, are leaning towards more eco-friendly alternatives.
This chapter will dive deep into the array of sustainable choices in plastering materials, waste management, and supplier selection for a greener plastering project.
4.1 Green Plastering Materials
Traditional plastering materials are energy-intensive in production, contributing significantly to environmental pollution. Waste generation is another concern when plasterboard is discarded. This section explores environmentally-friendly alternatives that not only minimise harm to our planet but can also enhance the aesthetic and functional value of buildings.
4.1.1 Lime Plaster: The Eco-friendly Old-timer
Lime plaster, one of the most ancient building materials, offers a sustainable option for modern construction. Its production process involves burning limestone at a relatively low temperature, which results in less carbon dioxide emission than the manufacturing of cement or gypsum plaster.
Moreover, lime plaster has a unique ‘breathing’ property. It allows moisture to evaporate, preventing dampness and mould growth, thus improving the indoor air quality. But what truly makes lime plaster stand out in terms of sustainability is its ability to reabsorb CO2 as it cures, aiding in reducing the concentration of greenhouse gases in the atmosphere.
4.1.2 Clay Plaster: Harnessing the Power of Nature
Clay plaster is a prime example of how naturally abundant elements can be harnessed in construction. Produced from clay, sand, and straw or fibres, it is a recyclable and compostable material that creates virtually zero waste.
One major benefit of clay plaster is its ability to regulate indoor humidity levels, contributing to a healthier and more comfortable living environment. Furthermore, clay plaster does not off-gas harmful chemicals, ensuring better indoor air quality compared to many conventional plasters.
The energy-efficiency of clay plaster production also contributes to its eco-friendliness. The raw materials are mixed and left to dry naturally, eliminating the need for high-energy kilns.
4.1.3 Recycled Plasterboard: Turning Waste into Value
In an effort to reduce waste, some manufacturers have started producing plasterboard from recycled materials. This includes waste plasterboard, which can be processed and remanufactured, thus extending the life of the materials and diverting them from landfills.
While recycled plasterboard may not be entirely zero-waste, it signifies a positive move towards a circular economy in the plastering industry, where resources are kept in use for as long as possible, and waste is minimised.
Using recycled plasterboard also requires less energy compared to producing new plasterboard, further decreasing the environmental footprint of your plastering project.
Chapter 5: Plastering Industry Trends
The plastering industry, like many others, is constantly evolving in response to new technology, societal changes, and environmental concerns.
This chapter will highlight some of the most impactful trends and emerging practices that are shaping the future of plastering.
5.1 Technological Innovations
Technological advancements have been instrumental in refining the art of plastering, driving efficiency, precision, and innovation in this age-old trade.
5.1.1 Advanced Plastering Machines
Technological innovations have led to the advent of advanced plastering machines.
These machines offer a multitude of benefits, including efficient mixing of plaster and quicker application on walls and ceilings.
Some machines even come equipped with integrated silos and pumps that not only store but also mix and pump the plaster to the site, saving time and effort.
5.1.2 Digital Measurement Tools
Digital tools such as laser metres and digital spirit levels have become commonplace in modern plastering. They allow for precise measurements and cuts, minimising errors and waste. Digital modelling software also enables professionals to create accurate visualisations of the end product, aiding in the planning and execution of complex plastering projects.
5.2 3D Printed Plaster
The integration of 3D printing technology into construction presents an exciting frontier in plastering. This technology allows intricate, customised designs to be printed in plaster, creating possibilities for highly detailed decorative plasterwork that would be exceedingly difficult, if not impossible, to achieve by hand.
5.3 Smart Plaster
The advent of “smart” plaster and plasterboard is another innovative trend in the plastering industry. The term refers to materials that can do more than just provide a surface finish.
Smart plaster could potentially regulate indoor humidity levels, absorb toxins from the air, or even change colour based on temperature or light conditions.
These materials could offer improved energy efficiency, health benefits, and enhanced aesthetic appeal, though their development is still in the early stages.
5.4 Sustainability in Plastering
The increasing demand for sustainability is significantly influencing the plastering industry.
Eco-friendly alternatives to traditional plastering materials, like those discussed in the previous chapter are gaining popularity. Furthermore, the industry is exploring methods to reduce waste and minimise its carbon footprint while maintaining the quality and durability that plastering projects demand.
Strategies include utilising green building materials, adopting energy-efficient production processes, and implementing waste management practices that prioritise recycling.
This trend represents not only a response to the growing global emphasis on sustainability but also an opportunity to innovate and evolve plastering practices for the better.
Conclusion
This guide has provided a comprehensive overview of the plastering process, starting from the essential materials and moving through their preparation and application.
The different types of plaster – gypsum, lime, and cement, were discussed along with auxiliary materials like plasterboard, jointing tape, plastering beads, and PVA.
These materials were then contextualised within the preparatory phase of a plastering project, with emphasis on the importance of meticulous preparation for achieving quality results.
The guide also considered the growing importance of sustainability within the plastering industry, with an exploration of eco-friendly materials and practices. Lime and clay plasters, along with recycled plasterboard, were introduced as greener alternatives that can contribute to a more sustainable construction landscape.
Finally, a spotlight was thrown on the latest industry trends, including technological innovations and the advent of 3D printed and smart plaster. These developments, alongside the emphasis on sustainability, underscore the dynamism of the plastering field and its continuous evolution.
In conclusion, whether you’re a DIY enthusiast or a professional plasterer, understanding these elements – the materials, their preparation and application, sustainability considerations, and industry trends – can enhance your plastering work, improve its quality, and contribute to a more sustainable construction environment.
Plastering is a skilled trade that requires precision, attention to detail, and the right tools to achieve a high-quality finish.
With a wide variety of tools available for different plastering tasks, it’s essential to know which ones are best suited for your specific project.
This ultimate guide to plastering tools will help you understand the purpose and usage of each tool, ensuring that you’re well-equipped for a successful plastering job.
Chapter One – Plastering Trowels
One of the most essential tools in any plasterer’s toolkit is the trowel.
Trowels come in various types, including finishing trowels, skimming trowels, and more, each designed for a specific purpose in the plastering process.
Finishing trowels: These trowels are used for smoothing and finishing the plaster surface, providing a professional and polished look. They typically have a flat, rectangular blade made of stainless steel or carbon steel and a comfortable handle for easy use.
Skimming trowels: Skimming trowels are designed for applying a thin layer of finishing plaster on top of a base coat, creating a smooth surface. They often feature a pre-worn blade to help achieve an even finish.
Bucket trowels: This small, flat trowel is useful for getting plaster and compound out of the bucket and onto the hawk or mortar stand.
When selecting a trowel, consider factors such as blade size and shape, handle type, and material.
A larger blade can cover more surface area, making the job faster, while a smaller blade offers greater control for detailed work.
Additionally, choose a trowel with an ergonomic handle for comfortable use during extended periods.
Proper trowel maintenance is crucial for ensuring longevity and optimal performance.
Clean your trowel after each use, removing any leftover plaster to prevent buildup.
Occasionally check for signs of wear and replace the trowel if necessary.
Chapter Two – Hawk and Float
The hawk and float are essential tools for holding and applying plaster during the plastering process.
A hawk is a flat, square platform with a central handle underneath, used to hold plaster while you work.
A float, on the other hand, is a smaller trowel-like tool used in conjunction with the hawk to apply and smooth plaster.
When choosing a hawk, look for one made of durable materials like aluminium or magnesium, with a comfortable handle that provides a secure grip.
The size of the hawk should match your hand size and the amount of plaster you’ll typically be working with.
To use a hawk and float effectively, practice scooping plaster onto the hawk with the float, then applying the plaster to the wall with smooth, controlled motions.
Chapter Three – Mixing Tools
Properly mixing plaster is crucial for achieving a smooth, even finish.
There are several tools available for mixing plaster, including mixing drills and paddle attachments.
Mixing drills: These are power tools designed for mixing various materials, including plaster. When selecting a mixing drill, consider factors such as power, speed settings, and overall durability. A higher wattage drill will provide more power for mixing thicker materials, while variable speed settings allow for greater control during the mixing process.
Paddle attachments:Paddle attachments, also known as mixing paddles, are used in conjunction with a mixing drill. These attachments come in various shapes and sizes, each designed for specific mixing tasks. A helical or spiral-shaped paddle is ideal for mixing plaster, as it promotes a smooth and consistent mix.
To properly mix plaster, add the dry plaster to a clean mixing bucket, then gradually add water while operating the mixing drill with a paddle attachment.
Be sure to mix the plaster thoroughly, eliminating any lumps or inconsistencies, and achieve the desired consistency based on the manufacturer’s recommendations.
Chapter Four – Straight Edges and Feather Edges
Achieving a flat, even surface is essential for professional plastering results. Straight edges and feather edges are tools designed to help plasterers accomplish this goal.
Straight edges: These are long, straight metal or aluminium tools used to check and correct the flatness of a plastered surface. To use a straight edge, place it against the surface and look for any gaps or high spots, then adjust the plaster as needed.
Feather edges: Feather edges are similar to straight edges, but they have a thinner profile and are typically more flexible. This flexibility allows for easier use on curved surfaces or in tight spaces.
When using these tools, work methodically across the surface, checking and correcting the flatness as you go.
This process helps ensure a smooth, even finish that will look professional and stand the test of time.
Chapter Five – Corner Plastering Tools
Achieving clean, sharp corners is an essential part of plastering, and specialised corner tools can help you accomplish this with ease.
Some of the most common corner tools include:
Angle trowels: These trowels feature a blade with a 90-degree angle, designed for finishing internal corners. The angled blade allows for smooth application and shaping of plaster in tight spaces, ensuring a clean, professional finish.
Corner floats: Corner floats, sometimes called corner sponges, are used to smooth and shape external corners after plastering. These tools consist of a sponge or foam material with a 90-degree angle, allowing you to work the plaster into a clean, sharp edge.
When working with corners, be sure to use the appropriate tool for the specific task, and take the time to ensure a precise, professional finish.
Chapter Six – Plastering Stilts and Hop Ups
For larger plastering projects or working on ceilings, plasterers often require additional height to reach their work area comfortably.
Plastering stilts and hop ups can provide the necessary elevation, allowing you to work more efficiently and safely.
Plastering stilts: These adjustable stilts strap to your legs and feet, allowing you to walk and work at an elevated height. Stilts offer flexibility and mobility while working on high surfaces, but they require practice and skill to use safely.
Hop ups or ladders: Alternatively, you can use a sturdy hop up or a ladder to reach higher areas. While these options provide a stable platform for working, they may not offer the same level of mobility as stilts.
Whichever option you choose, always prioritise safety when working at height, using appropriate fall protection measures and ensuring that your equipment is in good condition.
Chapter Seven – Cleaning and Maintenance Tools
Proper cleaning and maintenance of your plastering tools are essential for extending their lifespan and ensuring optimal performance.
Some essential cleaning tools include:
Plasterer’s brush: A soft-bristle brush is perfect for cleaning your trowels and other tools after use. The soft bristles help remove plaster without damaging the tools.
Cleaning water and sponge: Keep a bucket of clean water and a sponge nearby while working to wipe down your tools as needed. Regular cleaning prevents plaster buildup, which can affect the performance of your tools.
After each plastering job, clean your tools thoroughly, removing all traces of plaster, and store them in a dry, protected location.
By understanding the purpose and usage of each plastering tool, you’ll be well-equipped to tackle any plastering project with confidence.
With the right tools and techniques, you can achieve a professional, high-quality finish that will stand the test of time.
Conclusion
This exploration of plastering tools has offered an in-depth view of the essential instruments used in the plastering trade, from the basic hand tools to specialised equipment.
The discussion began with the ubiquitous plastering trowel, the plasterer’s primary tool. Used for applying, spreading, and smoothing plaster, the trowel is a versatile instrument available in different shapes and sizes to accommodate various tasks and preferences.
Next, the focus shifted to the hawk and float. The hawk, a flat platform for holding plaster, and the float, used for smoothing and levelling the plaster, form a crucial partnership in the plastering process.
The importance of proper mixing was underscored in the section about mixing tools, which are essential for creating a smooth, workable plaster mix. Mechanical mixers and sturdy buckets, as well as mixing paddles for drill attachments, were identified as key tools for this stage.
Then, attention turned to straight edges and feather edges. These tools ensure a flat and level finish to the plaster, vital for achieving a professional-looking result.
Corner tools were introduced next. These specialised tools help create clean, sharp corners and edges, enhancing the finish and durability of the plasterwork.
The guide also ventured into the realm of plastering stilts and hop ups, essential for reaching high areas. While these may not be necessary for every project, they can increase efficiency and comfort for extensive or high-reaching plastering work.
Finally, the importance of tool maintenance was emphasised with a discussion on cleaning tools. Keeping tools clean and in good working order not only extends their lifespan but also ensures the best possible finish to plasterwork.
In sum, a well-equipped plasterer’s toolkit should feature a range of trowels, a hawk and float, mixing tools, straight and feather edges, corner tools, and potentially stilts or hop ups.
Additionally, proper cleaning and maintenance tools are critical for ensuring the longevity and effectiveness of this equipment. Understanding these tools, their use, and care is vital for anyone engaged in plastering, whether as a DIY enthusiast or a professional.