A Step-by-Step Guide to Mixing Plaster

If you’re wondering how to mix plaster by hand, how to mix plaster for wall repair or how to make plaster for walls, then you’ve come to the right place! With the correct information and technique, mixing plaster can be simple but mixing it to the correct consistency is hugely important for getting the best results.

Plaster can be crucial for giving walls a smooth and flat finish so you can go ahead and paint them easily. Always remember: start by adding the plaster to the water, never the other way around!

Why? Well how much plaster you will mix is always dependent how much water you start with. Usually, around half a bag of plaster is the most you can apply before the plaster sets if you’re new to the mixing game.

However, always bear in mind that plaster is relatively inexpensive and so it makes sense to mix too much rather than not enough. Try not to mix the plaster up too thickly as this can make it hard to keep plaster flat and to keep it to the correct thickness.

You will want to be spread the plaster as thinly as possible and keep it very flat. A nice thin mix will always produce the best results. One potential pitfall is that the wetter the plaster is, the harder it can be for you to control.

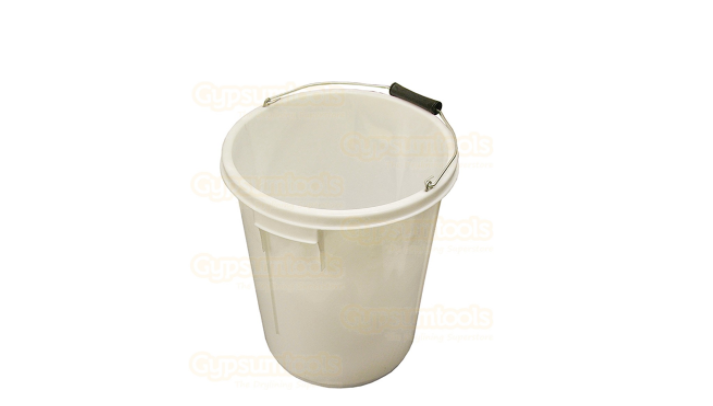
Step 1 – Pour Water Into the Bucket

Pour fresh water into a completely clean bucket that should be more than big enough to hold the complete mix and it should also allow space for the mixing to take place.

Screen Shot 2017-09-27 at 11.04.00

Step 2: Add the plaster to the mix

Next, pour half a bag of finishing plaster into the bucket. The composition should be roughly 50/50.

Add plaster (but not all of it). The plaster will sink and a good rule of thumb is to add just enough in the first instance that it begins to heap on the surface of the water.
You should be adding approximately half of your total amount of plaster in the first instance.

Step 3: Mix the Plaster

Next up, you will want to immediately take your drill and paddle to start mixing up the contents of the bucket before you get any lumps that you may struggle to mix out. If you haven’t got a mixer drill, don’t fear! A bit of wood can be used to mix the plaster as long as it’s fairly smooth.

Make sure you complete this step thoroughly and smooth out any parts that are still dry or lumpy. If you’re using a drill, make sure to have it set on a very slow speed so as to stop any plaster splashing up out of the mixing bucket.

Swirl in both directions lifting the paddle up and down making sure to get into every nook and cranny of the bucket.

Screen Shot 2017-09-27 at 11.04.31

Step 4: Add more Plaster into the mix

After you have mixed in the first load of plaster to a relatively smooth consistency, start to add more slowly as you mix. Continue to plunge in the mixer drill working out all of the major lumps.

Repeat this process trying not to add too much too quickly.

Step 5: Check plaster consistency

As you near to the finished mix you’re looking for a smooth, almost creamy consistency. If it’s still too watery then simply add more plaster a bit at a time until it feels right.

There is no ‘perfect’ in the consistency of plaster but in general, if you stick a small piece of wood in the mix it should be able to stand upright. Again, add water or plaster to adjust the consistency but try and avoid repeating this step too often. As with everything, knowing how to get this right straight away will come with time and practice.

Step 6: Clean your equipment!

Wash the equipment immediately after use. As tempting as it may be after completing a long and grueling job, never let plaster dry on your equipment as it can be incredibly difficult to remove and can ultimately destroy your tools!

Simply use a wet paint brush to get off the plaster. Note: On a second mix you will want to be aware that any contamination from previous mixes can make your plaster set too quickly and therefore be unusable.

You usually have around 45 minutes to use the finished plaster before it becomes obsolete depending on the temperature and conditions you are in so don’t hang around!

For more plastering tips check out this handy article.

The Best Drywall Knife for Cutting Drywall

Plaster Wall Repair

When it comes to cutting drywall, there are a number of different knives you can use to get the job done each with their own pros and cons. In this article we take a look at each of those options and determine how best to efficiently and quickly cut drywall.

There are other tools that you can use cut drywall such as:

  • Drywall saw
  • Drywall keyhole saw
  • Drywall rasp
  • Drywall tee square
  • Sheetrock saws
  • Circle cutter
  • Drywall router

…however today we’re looking at the best knives available on the market for cutting drywall.

Quick tip: Make sure you take time before you start any project to measure and purchase drywall panels to reduce the amount of cutting needed. Always cut the drywall panel accurately to length and make sure to use full sheets whenever possible.

The most standard cut you will do is the straight cut. This is easily completed with a utility knife..

L5100

Cut Drywall with Utility Knife

Wondering how to cut drywall with a utility knife? It’s super easy. Simply score the drywall with the utility knife by applying a bit of pressure to the knife along the line in which you wish to cut. Then simply snap the back of the drywall along the line you have scored using the knife to help you finish it off if needed. Sorted!

The Best Utility Knife to Cut Drywall

When looking for the best drywall knife brand there’s a number of factors to consider. Size: what’s the best utility knife size? Durability: how much cutting can it take before it needs replacing! Price: will it break the bank or am I paying for something that I don’t really need?

Here is a breakdown of a couple of the best utility knives you can get right now and why they’re so great:

Irwin Drywall Fixed Blade Knife – Perfect for drywall cutting applications and it’s slim nose allows the tool to move beautifully when scoring drywall. It can withstand incredibly dusty conditions that other tools simply cannot. Not only is it lightweight and robust, the Irwin Drywall fixed blade has a half turn thumbscrew for tool-free access and trigger grip for cutting whilst on the pull.

Hultafors UK-Z Retractable Utility Knife – Ergonomically designed for top quality levels of comfort and safety, this knife is durable and sturdy. The Hulfators UK-Z Retractable Utility Knife has very few moving parts making cleaning and changing blades super easy! It also has an angled design, durable zinc housing with screw wheel making it very easy to open. Handy!

Marshalltown Utility Knife – The Marshalltown utility Knife with Soft Grip has push button blade release ability, butterfly storage that holds five extra blades and a durasoft handle for increased comfort.

Marshalltown Utility Knife 9mm Soft Grip Break Off Blade – Comes with two extra 9mm/13 point blades stored inside the handle. The blades on this particular knife lock in position for even more accurate scoring.

Kraft Stainless Steel Jointing Taping Knife – Comes with a strong one-piece blade and handle and the blade is tapered and non-rust.

The Best Utility Knife on the Market


utility knife level 5

Level 5 Soft-Grip Professional Stainless Steel Taping Knife – Having a wider, thicker and stronger blade back than competitive models, the Level 5 Soft-Grip Professional Stainless Steel Taping Knife is also incredibly lightweight with it’s soft-grip handle. Not only this but the unique, ergonomic design helps to reduce fatigue!

You can pre-order the Level 5 Soft-Grip Professional Carbon Steel Putty/Finishing Knife along with a whole new range of top quality Level 5 Tools from 1st October 2017. Call to order on: 08456 254 321 or contact us online.

Level 5 hand tools have been built with 20+ years of feedback from professional finishers in the industry.

They are incredibly robust with industry leading designs and high-quality materials and workmanship. Level 5 Tools will always exceed any expectations on your drywall job!