Switching To Automatic Drylining Tools

Many people take pride in their profession and when it comes to drywall finishing, this is no exception. It takes a tremendous amount of skill and knowledge of the craft to perfect the application method and become great at the job, which is why the Drylining Professionals are in such high demand.

However you choose to finish your drywall, ultimately it’s the skill of the person doing it that will have the biggest impact on the end result. But it’s the time it takes to get to that end result that has so many professionals switching to automatic drylining tools.

There’s certainly no doubting the vast impact that using an automatic taper has on resource management, use of time and overall productivity.

And when you consider that the best hand finishers become the best automatic drylining tool users, you’ll see how useful the combination of speed and skill can be when using both methods together on a job to ensure high productivity and the best possible flawless finish.

It’s for this reason that a professional and skilled dryliner may choose to do the majority of the work with an automatic tool for acceleration, but save the finer detail to do by hand for visual appeal. Not only will they double their productivity, but they can also still take pride in the skill that went into the work.

Making the transition

Unfortunately, some drylining professionals are still unwilling to give the automatic tools a try. Some fear it will completely remove the need for any level of skill within the job, while others feel that the speed and accuracy of the equipment will leave them out of work having finished the job at an increased speed of delivery.

However there’s a flip side to this argument and that is, if a job is finished to a high standard sooner, there’s more profit to be made and less time needed before moving on to the next job. Getting the work finished earlier also makes you or your company more competitive in the marketplace and therefore likely to win more projects. So, despite getting the work completed sooner, there’s the likelihood of even more straight after.

Then, bearing in mind that it’s always possible to use a combination of the two methods, depending on the time available and cost of man hours, learning to use an automatic drylining tool will also give you a greater skill set, enhanced choice in your work and more marketability as an individual.

Save money on your drylining

In periods of uncertainty for the economy, companies are increasingly looking for ways to save money and one of the ways they can do this is by cutting down on labour costs. That’s not to say that people will lose work (because they can move on to another job straight away), it just means greater profit margins gained when a job takes less time.

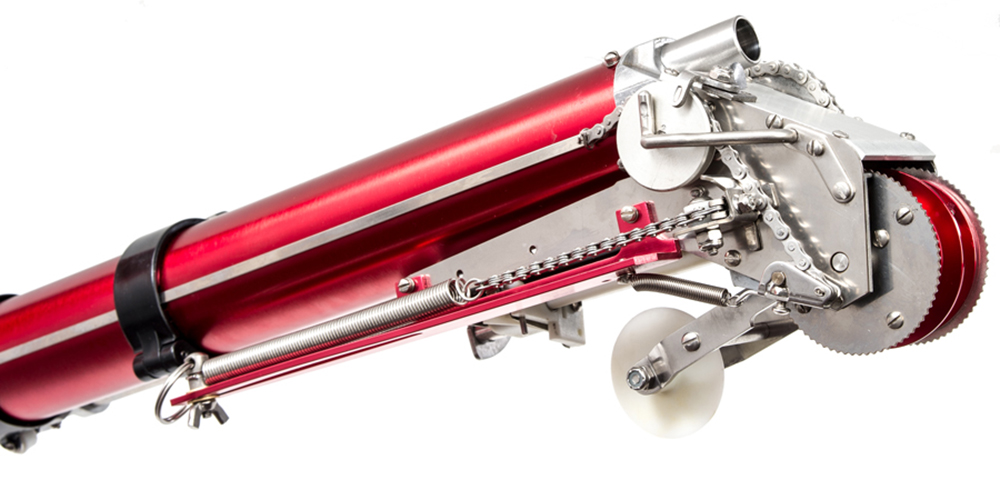
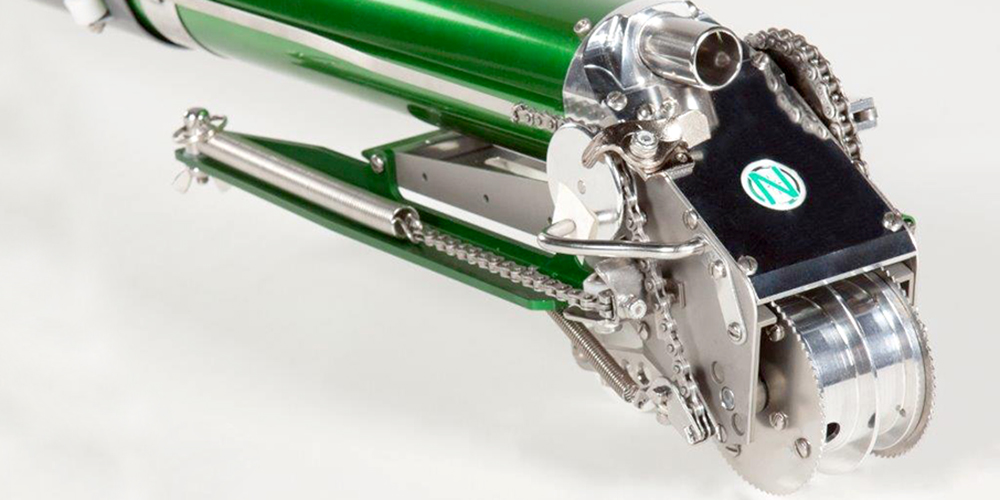
Switch to automatic taping tools with Gypsumtools

So, if you haven’t been keen on making the move from hand to machine when it comes to finishing drywall, then maybe now should be the time to give it a go.

After all, there’s nothing to say that there isn’t room for both in today’s industry, so work out where using automatic tools will save you time and money and where the more traditional, intricate methods would prove better.

And if you need any advice on the best automatic drylining tools there are, then get in touch with us to find out more, or take a look through our extensive range online.

Free Up Time & Save Money With Automatic Tools 

Free Up Time & Save Money With Automatic Tools

Free Up Time & Save Money With Automatic Tools

It has to be said we’ve heard plenty of arguments for and against the use of automatic tools when finishing drywall.

While many traditional drywall experts value the tremendous skill involved in working by hand and the great results that it can achieve, others rave about the fantastic benefits of being able to free up time and save money with automatic tools.

In a similar way, arguments can be made for and against renting these kind of tools, as opposed to buying them. But, when all is said and done, the decision comes down to individual choice and the priorities involved with the work.

If time isn’t on your side, you may go for the automatic tool, after all, the more man hours you can save on a job, the greater profit margin that can be achieved, while you still get consistent, high quality results.

It’s also useful if your team isn’t skilled in drywall finishing and doesn’t have years of experience behind them. By using automatic tools, you can be assured that the right amount of compound will be used on each joint, at the right width and with a proper crown, for example. Every joint will look the same and you will make a big saving on man hours in the process.

However, a veteran drywall finisher, who has that special, highly skilled touch and more time to complete a job using tools, tape and compound, might value the time to focus on the finer details and create a completely flawless finish this way.

Better to buy or rent automatic tools?

Large companies employing a workforce who shares tools may choose to rent rather than buy, because the tools can be easily changed for clean and fully calibrated ones. Hundreds of hours of worktime can be lost through having to fix broken tools and go over the poor work that a defective tool has left behind, so, by renting one, there’s no down time on the job, while you get the tool repaired, serviced or parts replaced.

On the other hand, someone working individually might relish the chance to use their own tools and because they’re their own, they would be more likely to take better care in maintaining them and make better use of their time through having a fully functioning, clean tool.

The skill and proficiency of a drywall finisher also has a big part to play in the finished result, whatever form of finishing method you employ. So, it’s also fair to say that someone who is skilled at finishing drywall by hand will also become very skilled at using automatic taping tools, in which case, you have a win-win situation. However, many skilled hand finishers are cautious about making the change because they fear that it will diminish the need for skilled workers.

Benefits of automatic tools

So to round up, the biggest benefits of automatic tools are the savings on time and, as a result, money, but there are also many more. See below:

  • Enhanced productivity
  • Jobsite savings on man hours
  • Less cost, greater profit
  • Uniform, consistent job throughout
  • Generally better results
  • Ensure exact width and crown
  • Less physical effort
  • Less skill needed
  • Work requires little sanding after
  • Equipment is now more ergonomic and lighter than ever
  • Causes less muscle strain and fatigue

Order your automatic drywall tools today

At Gypsumtools we take great pride in giving our customers the most satisfaction, through offering them a choice of plastering and drywall equipment to suit their needs. If you would like to find out more about what we have to offer, then take a look at our excellent range of products online and discover the masses of benefits they can bring.

Improve Your Taping With this Guide  

There’s certainly an art to plastering and when the job is done well, it can look absolutely stunning. In the same way, when you’re putting up drywall, it’s important to take care to use the proper procedures at every step of the way to achieve an awesome end result.

So, for instance, once the drywall is up, you’ll need to inspect it and check the joints are nice and flat before you begin the taping process. And this is where improving your taping begins.

It’s important to know that your drywall is even first. If there are any problems with your fasteners and trim for example, this should be sorted out. Also you should check you have the right kit before you start, such as the right taping knives and compound pan and ensure that they’re completely clean from the job before. Avoid putting fresh compound on top of dried on stuff!

If you’re looking to get the best results when you’re doing a drylining project, then you can improve your taping with this guide.

GET YOUR COMPOUND RIGHT

Mix up your joint compound to the correct creamy consistency, as per the manufacturer’s instructions and conditions where you’re working. Depending on the layer you’re doing, you can either use ready mixed or the setting type which comes in a powder. (This will need to be mixed with a paddle or mixer, using clean water on a surface which can be cleaned easily or thrown away).

USING YOUR AUTOMATIC TAPER

Every time before you use your taper, make sure all the parts are oiled and working well, also ensure that the gooseneck is attached. If it could do with a service, get it done before you start.

BUTT JOINTS

These are joints with a short or cut edge that are not tapered and more difficult to finish. They are taped and wiped in first (wipe from the centre of the joint in an outwards motion to avoid wrinkling).

As you roll along the joint, remember to lead with the head of the taper. If you’re new to using the taper, remember to stop 2 ½ inches from the end of the joint, and cut the tape by pulling down on the control tube. Then you can roll out the end of the tape, pull the taper away from the wall, and advance the tape for the next joint by pushing up on the control tube. This is a method that can be used throughout.

DO FLAT JOINTS/SIDEWALLS THEN CEILINGS

Follow the details on application, as per butt joints above, and remember to wipe in.

Use both drive wheels on the joint for the first few inches when taping ceilings.  Then engage the creaser wheel and tilt the bottom of the taper slightly towards you with only one drive wheel on the drywall surface.

When not in use, the taper head should be put into a bucket of water to prevent the compound from drying.

ANGLE JOINTS

Angle tape can be applied in conjunction with the corner roller and corner finisher, which should have compound applied to the corner wheels and filling the cavities of the corner finisher.

Both wheels must run along the wall surfaces in a straight line with the creaser wheel extended.  Again, use the stopping method above.

For vertical angles, roll out a 6-inch tab of tape and put it at the bottom of the angle, then roll the drive wheels along for the first couple of feet to avoid pulling the tape away from the end of the joint. Ease off the pressure on the creaser wheel as you go, to keep things even.

Using the corner roller with compound on the wheels, start from the middle of the angle joint, and use light pressure to roll toward both ends. Do this a second time with firm pressure, so that any excess compound comes out from under the tape ready for the corner finisher.

Smooth the compound over the tape using the corner finisher at the end of the joint then, using light pressure move the tool along the joint to the other end.  Lead with the centre nose clip and the blades wiping behind.  After angles, detail the bottom corners and ceiling angle intersections with a drywall knife. also ensure that the gooseneck is attached FIRST COAT NAILS/SCREWS

Use a nail spotter to fill fastener depressions. Apply moderate pressure to start the compound flow and draw the tool along the row of fasteners, coming away from the wall in a sweeping motion.  Excess compound should be skimmed off while leaving a slight crown over each fastener.

  • Give all tools a thorough clean afterwards and inspect the work you’ve done, ensuring all compound is removed from your equipment and flats and angles, fasteners, bead and trim are all done properly.

To find out more about the right tools for your drywall job, take a look at our range online or get in touch with us today.

Find out how you can make huge savings on our taping tools with our Taping Tool Kit Builder, featuring DeWalt and Level 5 taping tools.