OX Tools & Where To Buy Them

ox tools uk

OX Tools is recognised in the construction industry as a manufacturer of tried and tested tools that are not only dependable, but affordable too. Want to know more about their range and the benefits they can bring to you on the job? Read on!

About The OX Tools Brand

Celebrating an amazing 40 years of manufacturing high performance products, OX Tools was originally born in Australia in 1974. After building up a great reputation as being tough, dynamic, dependable and affordable, the brand brought their tools over to the UK.

Many industry professionals and individual DIYers alike regard OX tools as an ‘extra man on site’. Using American, German and other European technology, OX products are known for their innovation and toughness. High quality at a low price.

The OX Tools Range At Gypsumtools

Wondering where you can get your hands on the range from OX Tools? You’ve come to the best place! Here at Gypsumtools, we have a number of products that you’ll want to add to your toolbox. View the OX Tools products and buy online in no time at all!

Why not add a few more essentials to your basket? As there’s free delivery on orders over £99! Plus all the handy advice you’ll need to get the job done with your new tools.

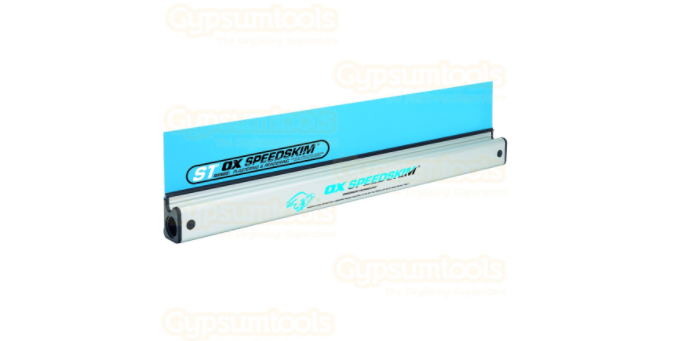
OX Speedskim Plastering Rule

OX Tools’ Plastering Rule is perfect for use on ceilings, walls and floors leaving the work with a perfectly formed, flat surface to continue with.

It has a semi-flexible, plastic blade and is very effective for use on medium or larger areas. This tool enables any plasterer to flatten and rule off with no trouble at all.

What’s more, the plastering rule also features the Speedskim Technology™ button release interchangeable blade feature.

Screen Shot 2017-12-19 at 10.34.41

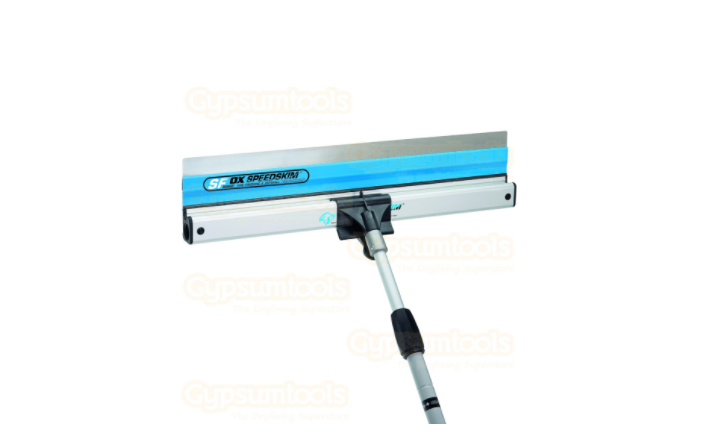
OX Speedskim Finishing Rule

The Speedskim technology has been designed with you in mind. The revolutionary Speedskim Stainless Flex Finishing Rule is designed to increase meterage output and enhance the finish of the job whilst reducing the effects of fatigue and RSI.

Making your job much easier, it is also designed to take replacement blades with a smooth blade change mechanism and can be used with a universal pole attachment to access those hard-to-reach areas (both sold separately).

This high-quality tool enables you to achieve the same great finish for all gypsum based finishing plasters, whether it be applied by hand or spray.

ox tools

View the whole range of OX Tools.

If you have any questions or queries about any of the products, give us a ring on 08456 254 321 or email [email protected] and we’ll get back to you as soon as we can.

Best practices for Sanding Drywall with a Power Sander

power sander drywall

Drywall is an extremely popular construction material for finishing interior walls. It’s durable, cost-effective, easily installed and repaired, so there’s little wonder why it’s the first choice for both DIYers and contractors.

However, sanding can be slow and tedious work unlike the heavy duty work of moving and installing panels of drywall which is much quicker. It’s often described as one of the worst jobs in home renovating!

Why? Well, it can often be the case that you end up cleaning for much longer than you are actually sanding the drywall!

If you don’t plan correctly, you will need to vacuum several times as dust gets into the smallest cracks although vacuuming drywall dust can even void the warranty on many vacuums. Even then, the dust is so fine that it gets into everything and is difficult to remove, or even to vacuum.

To avoid all of this drama, make sure you invest in the appropriate sander equipment and protect yourself and your belongings from dust before you get started. Remember that you will be preparing your walls for paint or wallpaper, so you will need to make sure you achieve a smooth finish.

A good primer or sealer may help hide any imperfections on your walls but sanding is the last chance to get everything right beforehand. Sanding can only be done well if you have taken care with all the other processes, like taping and mudding.

If your sanding is not done well, it will show when the paint is dry. At the top of the list of important know-how is proper sanding technique.

Sanding drywall is the last step in the drywalling process. So after you’ve hung and taped drywall, follow these steps to sand it perfectly smooth.

Preparing Your Drywall for Sanding

If you’re using basic sanding tools and products, the only way to prevent dust damage and inhillation is to:

  • Seal off the room with plastic in the doorway so that dust does not escape into the rest of your house.
  • Properly ventilate the room, but do not open all windows, as this will cause the dust to circulate.
  • Lay a drop cloth on the floor to catch the dust.
  • Covering any furniture in the room with plastic.
  • Wearing goggles and a dust mask to protect yourself from dust inhalation.
  • You might also want to wear a hat to keep dust out of your hair.
  • A Dust Mask offers some protection against large particle inhalation.

Whilst all of this is good advice for a dusting novice, there are a number of tools that we at Gypsumtools stock that can prevent all of these problems…

Sanding Tools for Drywall

We’ve already covered off some of the protective clothing and materials you can use to prevent any damage to your room, but what about the Drywall Sanding Tools themselves?

Giraffe® Wall & Ceiling Sander

Giraffe® Wall & Ceiling Sander

The Giraffe® Wall & Ceiling Sander is electronically controlled, has soft-start, overload protection and also speed selection with adjuster wheel too.

With it’s dust-proof on/off switch and effective dust extraction, this tool really does promote a dust-free working environment

Flex Safety Vacuum Cleaner With Automatic Filter Cleaning System

Flex VCE35 M Class Vacuum Automatic Filter Cleaning System

The Flex Safety Vacuum Cleaner comes with an Automatic Filter Cleaning System giving you an excellent extraction result.

The Class M safety vacuum cleaner is suitable for all dusts.

Vitrex Sander For Drywall

Vitrex Drywall Sander

The Vitrex sander for drywall has a super powerful motor that makes sure enough power is transferred to the sanding pad for smooth operation, always.

The double dust extraction system helps keep the work area clean and free from debris.

Sanding Drywall Steps

As mentioned before, Drywall Sanding can be frustrating and messy, but it can also be fun and easy if you follow these simple steps:

  • Avoid Oversanding – Oversanding can damage the face of your drywall and leave scuff marks. Always sand lightly to start with, you can sand more if it’s not enough.
  • Use a Pole Sander – Pole Sander’s are perfect for reaching hard to get places such as tall walls. It also allows you to do longer strokes as you sand. Always keep the sanding head angled slightly to avoid any slippage.
  • Wet sanding – You can use water as lubrication to get rid of grit particles that are removed from sanding. Without any liquid, materials can build up in the sandpaper and leave behind scratches that ruin your wall.
  • Hand sanding – Power sanders are crucial for getting the majority a job done quickly and efficiently as well as giving you a great finish. However, if you want to finish off little bits that you may have missed with the Power Sander, hand sanding works a treat, even on Drywall.
  • Use a Sanding Sponge for Corners – Sanding sponges are much less likely to damage the opposing wall when sanding a corner

For more information on Power Sanding Tools & Drylining Tools then check out our blog or contact us