Why Is Plastering Tape So Important?

Drywall Taping

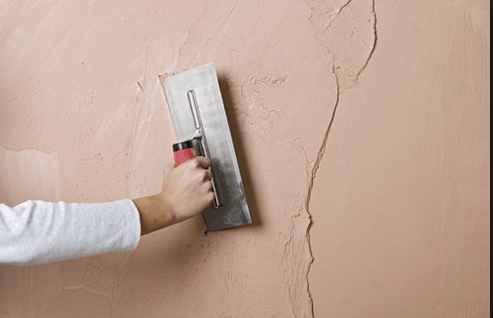
There’s one thing you should never forget that when you’re plastering a wall – and that’s preparation. Preparation is everything.

A flawed surface underneath your handiwork is going to be much harder for you to cover. Get it right, or you won’t be able to guarantee to get that smooth professional finish you’re after.

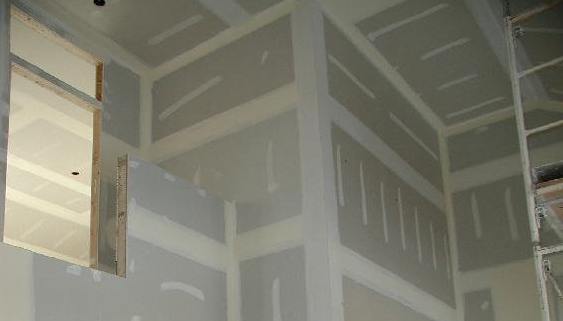
Skip this step and you’ll spend far too long working to hide the dodgy joins that haven’t been properly prepared in the surface below. That’s why, whether you’re plastering a tiny patch of wall in the kitchen or a major commercial property, plastering tapes are going to be your all-round best friend.

Types Of Plastering Tape

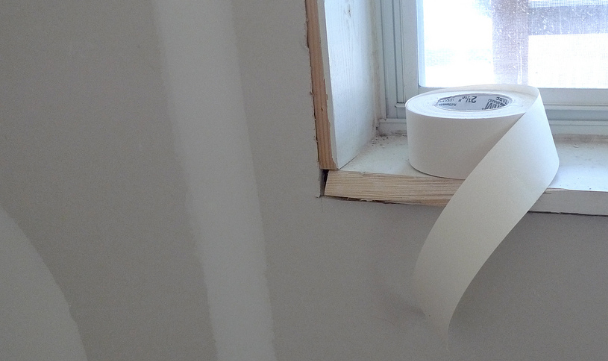
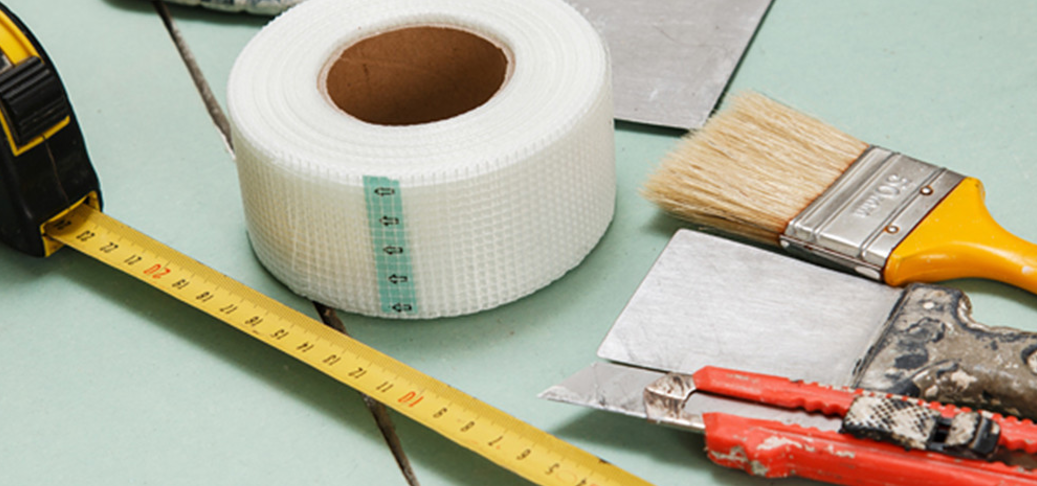
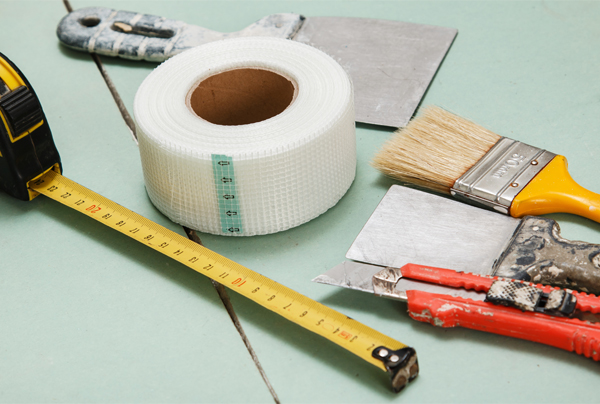
Plastering tape comes in a few different types, making it suitable for the whole range of walls and surfaces you could ever find yourself drywalling. Basic drywall tape is usually made of paper, which means it’s easy to tear, flexible to use, and lightweight to apply.

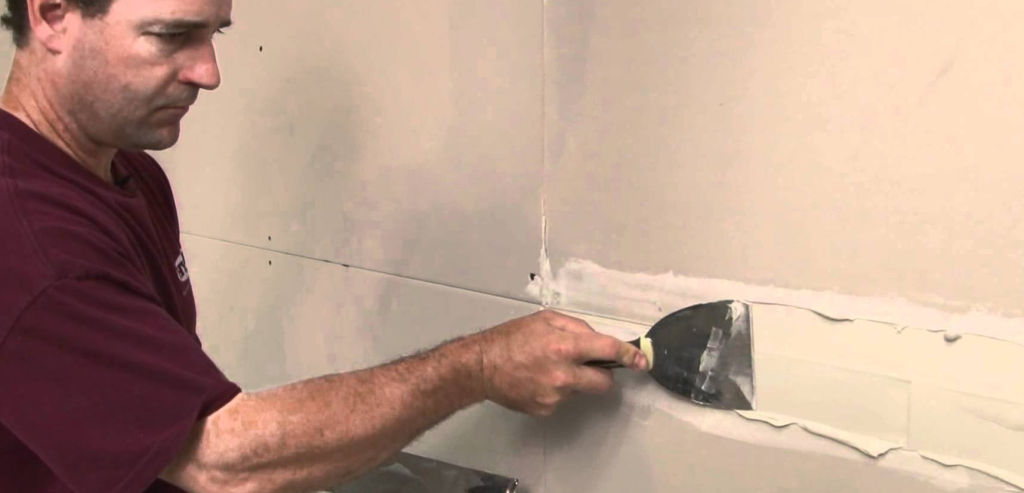
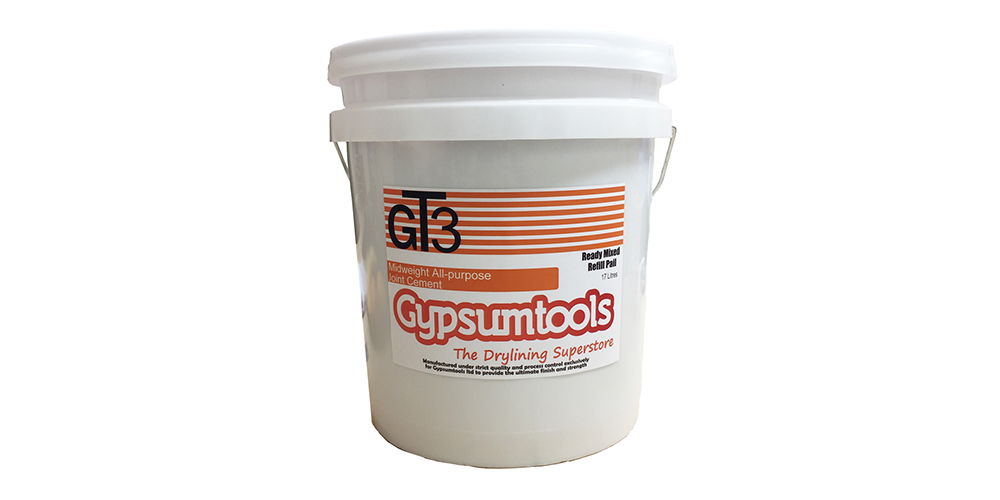
When you’ve applied your jointing compound to fill the gap between plasterboard panels, a strip of drywall tape over the top ensures that the join doesn’t become visible again when the wall has dried. Perfect.

Scrim tape is very popular for beginners working with plasterboard, and it’s also a good all round tape. It has the added benefit that you don’t need to use jointing compound with it, so it’s less fiddly. Made of fibreglass, the construction is like an interwoven mesh of threads, which gives it the flexibility and strength you need, and it won’t bubble up or move around like some other tapes.

Lastly, we’d also highlight Wondertex metal angle tape which a superior style of tape that is reinforced with galvanised metal. This steel reinforcement gives the tape incredible rigidity and strength, making it perfect for finishing internal and external drywall corners.

With a specially-designed fold down its middle, this style of tape can be applied quickly and easily with the assurance each corner will be straight and sharp.

Find The Perfect Tape For The Job

When you’ve chosen the type of tape you need for this job, make sure you get the right width. Normally 1 to 2 inches is fine, but if you’re working on a bigger area, you can get much wider tapes. Ultimately you just want to keep the joins as tidy as you can, so speak to us for more guidance here if you need it.

You’ll learn by experience how to get the preparation right the first time, with just the right drywall and plastering tapes.

Experienced dryliners have their preferences, and some stick with tried and tested tapes they’ve used for years. Others experiment with new tapes as and when they come on the market. The important thing is to finish the join as if it was going to be on display – then the plastering on top will be a breeze!

Still need some guidance? Get in touch and we’ll be happy to help!

Automated Tools Are Now Must-Haves – Here’s Why!

taping tools

Did you know, the very first drywalling taping tools came onto the market back in the 1930s? That’s nearly 90 years ago.

But the truth is, even in 2019, many contractors are still working as if they’re back in that era. and it’s understandable.

Is It Time To Upgrade?

If you normally do your drywalling by hand in the time-tested way most professionals learned their trade as apprentices, you might not have given the new automatic taping tools a second thought. After all, you don’t want to find yourself doing a job that’s below par. You’ve spent years honing your craft and taking pride in your work.

But if we can get your attention just for a second on the subject of automated tools, we might have some good news for you.

We’d like to let you know how plugging in could actually make all the difference to your business – not just in terms of the hard work you’re putting in, but in cost-efficiency too. Not only would you save precious time and save on man hours, you could find yourself with a more efficient work flow that means you can charge the same for the same job, but spend less time doing it.

The most important thing to take away from this is that the quality of finish you get from automatic taping tools is impressively good and, if done right, will match hand finishers. Automatic taping tools are designed by professionals who know the high quality of manual work you produce – they are made to perfect drywalling fixing and finishing results at a fraction of the speed it would normally take you.

Get The Edge Over Your Competitors

In the marketplace you’re up against your local competitors every day, and the chances are they haven’t caught on to automation yet – so why not give yourself a big head start by getting trained in automatic taping tools, investing in the right equipment, and giving your staff the benefit of some professional development!

Your walls will be smooth, perfectly prepared – still the same recipe for job satisfaction as ever.

How about safety? Well, you’ll reduce the risk substantially by using automated tools as you’ll be able to reach higher places with less equipment. In fact, safe working is one of the driving forces behind the growing popularity of automated taping tools.

Have we got you interested? Contact us if you need some more information, or have a look through our range of taping tools to discover the equipment that will work best for your business needs. Don’t want to commit? Why not hire? We reckon you’ll soon be back to thank us for introducing you to automated taping tools!

Dry Lining Vs Wet Plaster – Which Is Best?

Dry Lining Or Wet Plaster

When it comes to getting that professional finish on your interior walls, it’s essential to go for the materials that give you the appearance and functionality you need, at the right price.

You’re basically faced with the choice between wet plaster and dry lining. Of course the decision will come down to a few different factors, like the price, soundproofing, ease of application, and the location of the work. Let’s go through a few general factors that will help you in most situations to make the right call.

Breaking Down The Options

Now, obviously, dry lining is faster. Getting a piece of plasterboard in place speeds things up, and you avoid the problem of cracks and surface issues that can be a challenge with wet plaster.

Wet plaster still has a lot of benefits though. Whether you go for gypsum that’s trowelled onto blockwork, or cement – both of which need to be finished with a skim of gypsum) – the cost is about the same. It’s an especially good choice for tricky areas, but it does need some degree of skill.

And there’s also the option for using traditional materials like lime or clay, which costs more but may work for you if you like a finish that’s in keeping with natural renovations.

Speed And Price Are Factors

If you go for plasterboard, you can tape over joins, or alternatively, add a skim layer of plaster over the whole surface. The dry lining can be joined to the wall with adhesive, or screwed onto timber frames. Fixings such as heating and shelves aren’t always a simple job with dry-lining, whereas a plastered wall makes this a much simpler job.

So basically, the costs aren’t that much different between wet plaster and dry lining, but the time difference and hence the labour costs are much higher for wet plaster. Depending on the time of year, waiting for the freshly plastered wall to dry can also take a few days wait.

If you’re in a rush, you prefer to save on labour costs, and if you’re not overly concerned about fixtures on this wall, then you may be better off considering dry lining.

Summary

We can provide all the dry lining tools you’ll need to complete the job too, from the simpler things like hammers and hawks through to the more specialist tools like drills, vacuums and sanders.

If you’re unsure about the exact tools you’ll need for job, just let us know and we’ll be happy to help. You can call us on 08456 254 321 or we also have a live chat option on our website.

Plastering & Drylining Health & Safety Tips For Work On-Site

Plastering Health & Safety Tips

When it comes to staying safe on the job, health and safety is not something you should ignore in any profession. Although it can sometimes seem time-consuming and even frustrating, the whole idea of this practice is to keep you and those working around you safe.

If you’re not convinced of its importance, it was widely reported that 507,000 workers suffered from work-related musculoskeletal disorders in 2016/17 – many of which were a direct result of inadequate health and safety practices. The Health and Safety Act 1974 regulations are regularly tweaked to improve worker safety and reduce this number as much as possible, but a small number of injuries are always going to occur.

Construction sites are a dangerous place so it pays to take your time and consider how you can stay safe when completing the task in hand. Thankfully plastering isn’t classed as one of the more risky jobs on site (compared to scaffolding for example), but there are still particular elements that require certain safety measures to be followed.

With that in mind, we’re going to take a look at some basic health and safety tips for plasterers.

Personal Protective Equipment (PPE)

All plasterers and Dryliners are required to protect themselves from hazards with specific protective equipment when working on site. This includes odour masks, shoes that are suitable for use on ladders and protective eyewear designed to block airborne particles and flying pieces of plaster.
Without these pieces of equipment, you run the risk of being injured by debris caused by plastering or falling from a height when applying plaster to a ceiling or wall. This leads nicely onto our next tip for health and safety.

Working At Height

Whenever you climb a ladder or work at height, stability is crucial in order to work safely and minimise risk. There are unfortunately a number of hazards directly linked to working at height and there will always be an inherent risk, but taking the required steps to ensure everything is as safe as possible can make a huge difference.

Make sure your ladder is in good condition and secured on a level, stable base before climbing. When working, don’t lean or overstretch yourself – come down off your ladder and reposition it to reduce the risk of falling.

Plasterers also generally have to use hazardous equipment such as heat strippers, drills and hammers to get the job done. With that in mind, having a stable base for your ladder or plastering stilts is even more important. If you can’t maintain your balance when working at height, you’re at risk of serious injury.

Working Alongside Other Tradespeople

Plastering is usually completed during the stages of a build where other tradespeople will still be carrying out their jobs around you – plumbers, tilers, carpenters etc for example. As you’ll be working in close proximity to others, it’s important to bear in mind their safety as well as your own.

In most instances, a cross trades risk assessment is required to ensure all workers can complete their jobs safely without impacting anyone else around them. Different tasks being completed mean different risks to those on site, so as there will be a bigger range of health and safety issues at play, it makes sense to understand all risks and work towards minimising them as much as possible.

General Health & Safety Guidance

All construction sites should undergo a full risk assessment as well as identifying who will be responsible for the safety and wellbeing of the workers during the build. This person should also be in a position to keep themselves up-to-date with new information regarding hazards or materials.
If you are involved in this on your site, here are some questions you should consider:

  • Is the workplace well organised and efficient?
  • Is the correct protective equipment available?
  • Are the correct health and safety signs/notices being displayed?
  • Are site visitors aware of the various health and safety risks?
  • Is there a first aid resource?
  • Who will report any and all health and safety breaches?

The CSCS Health, Safety & Environment Test

This is a minimum requirement for all plasterers regardless of whether you are a labourer, skilled worker or looking to move into a supervisory position on site.

The test is official recognition that you understand and meet the various health and safety standards that relate to your job. Alongside that, it’s also an indication that you remain up-to-date with the latest health and safety standards. To find out more about this test, visit the official CSCS site here.

Summary

Staying safe when plastering is straightforward if you’re able to correctly follow the appropriate regulations. Get yourself the right protective equipment, make sure you follow health and safety protocol when on site and you should be able to stay safe.

If you’d like to find out more about the minimum health and safety requirements for plasterers, visit the UK Government HSE site here for further details and example risk assessments.

The Different Types Of Plasterboard Joint Tape

Plasterboard Joint Tape

Getting the right materials for any job is vital. Fortunately these days it’s not hard to find just the right quality product, designed specifically for the task in hand.

That’s why plasterboard joint tape comes in two types, so when you’re planning the finishing materials for your next job you can make sure it fits the purpose. How do you know which kind of joint tape to pick? No problem. Here’s all the information you need on plasterboard joint tape.

Basically, for plasterboard joining you’re looking at using either scrim tape, or jointing tape. There are good reasons why either of these can be your perfect choice, depending on the circumstances, and of course there are often ways around it if you need to use the other. Let’s look at the difference between the two.

Scrim Tape

Scrim tape is a newer product and it’s made from fibreglass. It’s great to use on a flat join because it comes self-adhesive, so it’s ready to stick into place, without the need to add an extra compound or filler underneath. Because the fibreglass is woven into a mesh, it has flexibility and strength that keeps it firmly in place while you spread the jointing compound over the join.

Remember that, although you can fold scrim tape, and it can sometimes be perfect for internal joints, for angles it’s usually not going to give you the same crisp edge you’d get from a pre-creased jointing tape.

Jointing Tape

So how about jointing tape? Jointing tape is made from paper, which has its own pros and cons. In practice, many professionals still prefer it for most jobs as it’s cheaper and comes in larger quantities so it’s convenient to have on hand for a range of jobs. But it’s a matter of preference.

If you need a tape you can fold and crease for a corner or angled join, you’re probably going to be looking at jointing tape over scrim tape. Jointing tape comes ready creased, but it isn’t self-adhesive. It’s not as strong as scrim tape, and you’ll need to add extra jointing compound, although experienced tradesmen usually find ways around this.

Metal Angle Tape

Last but by no means least, we have metal angle tape. Perhaps the least well-known plasterboard tape variety, this option is specifically designed for external corner joints and unique angles like those around bay windows for example.

With such a specific purpose, you need to have the right circumstances to use this tape – there’s little point using it on a flat joint due to the two strips of thin steel embedded into the trim. This is what helps to create a crisp, clean finish on external corners and ensures a sharp line on all angles.

It’s the perfect solution for areas where rigid angle beads aren’t suitable, so if you’re looking for a simple way to tidy up angles and external edges with minimal fuss, metal angle tape could be the option for you.

Summary

So, in summary, the professionals have their own preferences and workarounds. But if you’re new to this kind of job, it’s generally worth using scrim tape for a flat surface and joint tape for an angle.

For a perfect result, it’s essential to choose the right plasterboard joint tape. An unwanted crease or bulge will be hard to hide, whereas a smooth and simple join is going to make it so much easier for you to achieve a professional overall finish. 

Plaster Or Plasterboard – Which Is Better?

Wet Plastering A Wall

When it comes to home improvements, there are always plenty of decisions to be made. Hard floor or carpet? Fibreglass or foam insulation? Paint or wallpaper? The list goes on.

Relining a wall brings about just one more choice – wet plaster or plasterboard? We’ve decided to take a look at this age-old battle to see if there really is a clear winner, or the choice comes down to your personal preference.

So if you’re looking to renovate your home, repair damage or just reline an old wall, chances are you’ll want to know which product is better for your needs. As established plastering and drylining specialists, our team are always on hand to help – but let’s take more of a detailed look at the two options in isolation.

Plaster

Generally the preferred option for masonry professionals in the UK, a traditional plaster finish can give your walls and ceilings a uniquely smooth result that plasterboard just can’t compete with. Not only does wet plaster give an exceptional finish, but it’s also known to be incredibly durable and resistant to degradation over time.

Choosing wet plaster also gives the added advantage of limitless restrictions – regardless of the size, shape or fiddly details like window bays or door frames, you can plaster any area given the right level of application and skill. We’d also throw in here that wet plaster provides a better airtight seal than plasterboard, meaning your room is better prepared to retain warmth and restrict water ingress from external sources.

Now you’re probably thinking ‘wet plaster is the winner’ – but there are some downsides to choosing this plastering method.

The biggest of these is the skill and craftsmanship it takes to apply wet plaster efficiently, which is why good plasterers train to hone their skills for many years as apprentices prior to working independently. Attempting to plaster a wall or room yourself is definitely not recommended – without the necessary experience, you’re almost certain to end up with an uneven finish and cracks when the plaster has dried.

Wet plaster is a fantastic option if you have money to invest and time on your side – if not, let’s take a look at the alternative.

Plasterboard – Drywall

If you’re looking for an effective finish to a wall, but just don’t have the time to get men on-site or wait for the plaster to dry, plasterboard is a fantastic alternative to the traditional wet plastering method.

Ready-made boards that you attach to your wall – plasterboard is as literal as it sounds. Simply measure up your wall or room, order the appropriate number of boards and that’s it. The only task left for you is to secure the boards to your wall, fill in the joints and screw holes with jointing compound to leave a single, smooth finish – we recommend 4T or Wondertex to do this. Thanks to their construction, plasterboard rarely cracks as the plaster is already dry and installing it is far easier than tackling wet plaster without prior experience.

The most challenging aspect will likely be the task of taping the joints of the drywall together, with jointing compound and tape, which again you’ll need the appropriate tools and materials to complete successfully – you’ll want a taping knife in a few sizes to make this step easier.

It’s fair to say plasterboard is definitely the more convenient of the two options, but if you’re looking for that uniquely smooth finish only wet plaster can bring, you’re going to need to pay more and wait longer. If your wall or room is unusually shaped, your hand may be forced when it comes to this choice, but it’s likely that installing plasterboard here would take longer anyway – cutting unique shapes with a jab saw, fastening them to a unusually-shaped wall and then filling in the joints and screw holes with jointing compound using a taping knife is only for the very brave.

Remember you’ll have to wait for this to dry and then hand sand the access off before to leave a smooth finish.

Summary

In summary, both types of plaster product have clear benefits. If you have the time and money to invest in a higher quality finish, wet plaster is almost certainly the preferable option. It brings a more durable, smoother finish with no joins between boards or screw holes to manually fill with drywall compound.

Plasterboard, on the other hand, is more time and money efficient – you can simply cut and install the boards, fill in the joints & screw holes and you’ll have your wall and ceilings relined in no time!

Still unsure which type of plastering option is best for you? Get in touch with our team and we’ll be happy to help.

What Is Drywall Taping? 

drywall without taping

If you have a spot of DIY or home improvement on the cards and haven’t come across the art of putting up drywall before, then you might be wondering what is drywall taping.

Essentially, it’s a really useful way of covering the joints and seams between drywall panels to leave a smooth and flawless finish on your wall.

Looking to learn how to tape drywall corners? Unsure how to tape drywall ceiling or simply how to use tape for drywall? Then read on…

When putting up drywall panels, you would fill in the seams or gaps with a small amount of joint compound, spreading and smoothing it evenly with a putty knife to the level of the wall surface. Then you can gently smooth the paper tape over the top until it sticks to the wall. If some of the mud comes out from under the tape, it can be feathered away to give a smooth surface.

Drywall taping is the way you create a strong bond between the sheets of drywall. Then a thin layer of joint compound is smoothed over the top to finish.

When drywall taping is done correctly, it’s impossible to detect where one-panel finishes and another begins, once the wall is painted, so it is the choice of many a drywall professional, especially when time and quality of finish are important.

Why Do We Use Tape On Drywalls?

Drywall tape is made from plain paper, which is a similar texture to the drywall panels. It comes in a roll which can be applied along the joints by hand or by using an automatic taping tool.

As well as covering the basic joints between two adjacent panels, it can also be used to cover internally. At this point the tape would be folded in half before being pressed into the corner, thus creating a seal that hides the area where the panels join.

Some people in the drywall industry ask about the need for tape for drywall and whether it would be just as effective to fill the joints with mud and smooth it over.

drywall without mudding

Why You Should Use An Automatic Taping Tool For Speed 

As we mentioned earlier, it is possible to apply the tape by hand, but if you’re able to buy or rent an automatic taper which applies compound/mud at the same time, then you can save yourself an awful lot of time, effort and money. The difference in taping time between using a machine and doing it by hand is actually pretty impressive.

The automatic taping tools are not only quicker at getting your drywall job finished, but they are also safer to use, as you can reach areas such as ceilings without the need for ladders or stilts.

If you’re looking to invest in an automatic taper, then we have some great examples by Level 5 and Northstar which will work perfectly with your tape.

Order Your Tape Online

When you’re in need of some extra tape for your drywall job, or you’re looking for the kit you need to get started, you can order your drywall tape online with Gypsumtools today and benefit from safe and speedy delivery direct to your door.

If you have any issues with your ordering process or have a few questions then please get in touch and a member of the team will be in touch to help you out!

Find out how you can make huge savings on our taping tools with our Taping Tool Kit Builder, featuring DeWalt and Level 5 taping tools.

What Is Joint Compound? 

When renovating, redecorating, or building somewhere new, chances are you’ll come across joint compound at some point in the taping process. And of course, if plastering is your profession, it will be something you’re already fully acquainted with.

For those wondering what is joint compound, then it’s a material that can be used as an alternative to traditional plastering to finish joints, corner bead, trim and fasteners, as well as for skim coating whole walls and ceilings. It’s not always referred to as joint compound either, often you might hear it described as mud or drywall taping mud too.

How Is It Used?

Joint compound is a creamy, toothpaste-like material, commonly used these days in hanging drywall in new builds and renovation projects, thanks to the speedy and simpler application than you might find with plaster.

It is spread across a surface to give it a smooth finish or cover up any blemishes or holes. And, in fact, many prefer it, because there is less level of skill needed and it is widely considered to be more forgiving than plaster, because of the greater possibility to smooth out and rectify mistakes.

What types of Joint Compound are there?

There are two main types of joint compound and here are the things to weigh up when you’re considering which joint compound to use:

Setting type joint compound

  • Like plaster, setting compound comes as a powder which needs to be mixed with water and sets to a very hard finish.
  • It is more moisture-resistant (which makes it great for damp areas, such as bathrooms).
  • It sets very fast (perfect if time isn’t on your side).
  • It comes with a variety of drying times, depending on the job you need it for and the area that you’re covering.
  • It hardens quickly and shrinks very little, which means less chance of cracks.

Ready-mixed joint compound

  • Considered to be the easiest option as it comes ready-made, which means no extra time spent mixing it up and less time clearing up afterwards.
  • Easier to spread then the setting type.
  • Water soluble (a plus point if you need to rectify mistakes, not so much of a good thing if you’re working in a damp area).
  • Sands very easily.
  • The fact that it hardens slowly over time through evaporation (or air drying) means it can be easily manipulated.
  • And there’s no racing against time before it dries, so it’s perfect for large areas.
  • The downside is that it takes a long time to dry (sometimes 24 hours), so you may only want to use it for a final coat or minor wall imperfections.

How is joint compound different from plaster

Plaster, as we know, is a material which has been used for centuries and there’s a good reason for that – it’s super tough. That’s why the walls of great castles and cathedrals have remained unblemished for hundreds of years. Plaster is pretty much impossible to damage with water and many kinds of impact, which is why these kind of walls have remained intact for so long.

Joint Compound Vs Plaster

But the thing about plaster is it takes a lot of skill to apply. And if you don’t know what you’re doing, then it’s a lot harder to fix your mistakes than it is with joint compound. So, while a highly experienced plasterer may take pride in the workmanship and levels of expertise needed to use plaster (not to mention, the durability of plastered walls), another plasterer, who is looking for speed and precision might favour joint compound instead.

Joint compound is also much easier to sand, which is why, when fixing plaster walls, people will often use this, instead of gypsum plaster to do it.

Order Your Joint Compound online

We have a range of joint compounds available at Gypsumtools. Order your joint compound online with us today.

The Benefits of Premixed Jointing Compound 

Drylining professionals and plasterers in general will all be aware of the greatness of things that help save time, money and effort in the workplace, while enabling them to achieve an excellent finish.

That’s why, when products hit the market that help you do just that, it’s a welcome sight all round. If you’re wondering about the benefits of premixed jointing compound and whether it really is as good as it says on the tin, then read on, because we have a perfect example of all the plus points above.

Our GT3 Midweight All-purpose Joint Cement is designed for the drywall finishing professional and made under strict quality and process controls exclusively for Gypsumtools.

Its aim is to save on effort and use of materials, not to mention offering the plastering industry the opportunity to finish drywall faster, with easy application and no dust or waste.

When finishing gypsum panel joints it can be used for everything from embedding tape to finishing joints, fasteners, corner beads and drywall trims to topping and texturing.

It is especially perfect for use with Level 5 automatic taping tools (which we also have in stock) and it also comes in handy when applying manually.

Coming straight from the box, premixed jointing compound is not only ideal when no water is available to mix it up, but it’s the fact that it’s ready to use virtually straight away, which makes it the choice of many professionals, water supply or no water supply.

It is also 30% lighter than traditional plaster and sands easier than other compounds, making your job easier and faster with excellent finishes.

Save Time & Money

Not only does the ready mixed compound give a super smooth, virtually pock free finish, but the ready mixed nature of it means you’ll save around an hour and a half in prep time per day, minimise the effort needed to do the mixing and reduce the amount of clearing up needed afterwards.

So, what you’re looking at is a big saving on the muscle fatigue that comes from lots of mixing time and an excellent finish in a fraction of the time. The fact that you’ll be able to get it finished quicker will also mean you can move onto the next job in less time and save money by doing so.

How to prepare your premixed compound

The creamy, smooth texture of the premixed compound is ready and waiting the minute you open the pail – all you need is two minutes of stirring with a Mixing Wheel.

You should ensure that it’s stored at room temperature for at least 24 hours prior to using it and contents should be poured into a mixing container, such as a clean, plastic bucket. After you’ve given it a light mix, also remember to do a small test to check it’s the consistency you need. If you find you need to add a bit of water, only use half a pint at a time, remix and test again. (Remember to not overmix as it’s this which might lead to pocking).

The compound should only be applied over dry surfaces and each coat should dry completely before applying another.

round up of the benefits of premixed compound

  • Save time
  • Save money
  • Less effort in preparation
  • Faster and easier to apply
  • No need for water
  • Reduce dust and mess
  • High quality finish
Order in Pallet Bulk Size or In Trial Size

Why not try out our premixed joint compound on your next drylining job and see how well it does? You can order online in pallet bulk size or if you’re simply looking to give it a go, try our trial size for starters.

Drywall vs. Plaster – What’s Best?

plaster-vs-drywall

plaster-vs-drywall

When wondering what materials to coat your interior walls with before decorating them, you might be weighing up your options and struggling to choose whether drywall or plaster is best.

Let’s face it, there are benefits to using both and that’s why here at Gypsumtools we have plenty in stock. But, if you’re asking yourself the question: “Drywall v plaster – what’s best?”, then here are some pluses and minuses that you might find useful, depending on what your priorities are.

Pluses of plaster and benefits of drywall

Plaster is a material which has been used for centuries and centuries. What started out as a mixture of lime, sand, animal hair and water has developed over time to become a product that offers a smooth and incredibly durable finish. Most commonly gypsum plaster is used these days and, as opposed to drywall, when applied correctly it can be around for centuries, thanks to its hardwearing nature.

However, drywall has become massively popular since the middle of last century. It is often cheaper because it’s not as tricky to apply, it takes less time to do, is less dusty to repair, there’s no period of waiting around for it to dry and you won’t get any of the cracks that can appear in plaster work, meaning less chance of call backs.

Downside to drywall and wet plaster

When applying plaster it needs to be done in several stages – which includes the brown coat, scratch coat and finish coat. This essential process means that it can take longer to do, leading to higher labour costs and then there’s the drying time. Plaster also needs to be applied by a skilled professional in order to avoid cracking and uneven walls, whereas, with a bit of know-how, drywall can be put up in no time.

On the other hand, the problem with a lot of drywall is that it’s easily damaged and is nowhere near as easy to fix things like radiators and shelving to as traditional, hardwearing plaster is. You also need to be as tight with gaps as you can, whereas plaster creates a better seal around openings and covers up blemishes much more easily. Also with drywall you’re limited on the design options, while a skilled professional can do all sorts of clever things with wet plaster.

Order your drywall and plastering tools online

When making your choice between the two, the main factors are to choose the finish which best suits the look and feel of the rest of the building – eg if it’s traditional, possibly plaster would look best and in a new home often drywall is favourable. You also need to weigh up what’s most important to you. Is it saving on time and cost, in which case drywall might be your guy. Or, are you looking for something more hardwearing, durable, shiny and smooth?

Once you’ve made your decision you can order your drywall and plastering tools online with us today and have the kit you need with you in no time.

How to repair water damaged ceiling plaster

Water damaged ceiling


Water damaged ceiling

When your ceiling is damaged by water, not only can it become unsightly, but it can also become dangerous in weakening the structure of the ceiling and even lead to the formation of mould if it’s left for long enough.

Whether the damp ceiling is caused by a burst pipe, hole in your roof or even a bath overflowing, it’s always important to get the damage fixed as soon as possible to prevent any further and more costly problems occurring down the line.

If you’re wondering how to repair water damaged ceiling plaster yourself, we have a few handy hints that you could try. 

Steps to repair the ceiling 

Before you even begin your steps to repair the ceiling, the very first thing that you should always look to do is to stop the leak or whatever is causing the water damage to your ceiling. So, repair the burst pipe, fix the roof, or turn the bath taps off! Then, you’ll need to make sure that it’s all dried out where the water has come through, so look to use heaters or towels, whatever works for you.

After the patch is dry, you’ll need to scrape off any loose materials or paint and remove all the damaged bits. Then you can coat all of the stains with primer or sealer.

While the primer is still wet, look out for any spots of loose paint that you might have missed and catch them before it dries. Clean all debris away and complete your priming, then once the primer is dry, scrape of any further debris with your knife.

After that it’s time to apply the first coat of joint compound or mud over the damaged area and when the mud is dry it can be lightly sanded to achieve an even surface. Once you’ve wiped it over lightly with a damp rag to remove the sanding dust and allowed it to dry once more, you can apply the second coat of joint compound and, as with the previous step, sand it again when the mud is dry.

After you have wiped the sanding dust away again you can cover the area with another coat of primer and then when the primer is dry, touch it up with some finish paint for the final result!

Plastering kit you might need 

Before you start, you might find it useful to have the following already to hand:

  • Putty knife
  • Joint compound
  • Drywall or plaster (if there are big holes in the ceiling)
  • Sandpaper
  • Towels or fans to dry the ceiling out
  • Paintbrush
  • Primer
  • Paint
  • Vacuum cleaner – for removing the dust that’s caused. 

Order from Gypsumtools today

If you would like to find out more about the type of kit you need for repairing water damaged ceiling plaster, or, to take a browse through the products we have available to help, either take a look at our website and order from Gypsumtools today or get in touch.


The role of drylining in construction

The role of drylining in construction

Given that plastering has been around for many hundreds of years, dry lining in comparison is still relatively new. But, as with many developments in technology it’s something which has saved many plasterers a lot of time and effort and that is why the role of drylining in construction is an important one.

Drywall is a panel made of gypsum plaster which is pressed between two thick sheets of paper and is used to make interior walls and ceilings. It can also hide pipes and wires, create space for insulation and smooth out uneven surfaces before they’re decorated.

Where it might take weeks to plaster a house the traditional way, with dry lining, using metal stud partitioning or plasterboard sheets, the job can be done in a couple of days.

Back in the last century drywall would be cut to size and fixed to the wall with nails or glue, but, as the standard of the drywall has improved over time, so have the accessories available to help get the job done, so drywall screws are more commonly used.

Brief history of drylining

The first forms of plasterboard were created in the UK at the end of the 19th century, then into the 20th century Gypsumboard evolved and the materials used to make it moved on, from using inner layers of felt paper to paper based facings.

As plastering tools and equipment developed more towards the modern day, plasterboard evolved even further and became easier to install and measure, while becoming lighter and less brittle. The materials used to fill the joints became more effective and tools such as automatic taping machines were developed.

Over time drywall has not only had to evolve to make the application of it easier but it has also had to keep pace with issues such as the environment, health and safety regulations and carbon footprinting.

How it’s used today Today

Today dry lining has many functions and often those working in the industry will appreciate the opportunity that it brings to make a real difference when changing the overall look and feel of a place to give it a new purpose.

Depending on the reason that you’re putting drywall up for, it can be finished to a Level 4 standard or for real perfection in high end applications you can go to a Level 5 finish to give some very visually pleasing results. And that’s before the paint even goes on the wall.

From lowering ceilings and raising floors to creating new spaces, rooms and corridors within already existing structures, it’s a physically demanding but rewarding job which can produce a feeling of satisfaction at the end, when you see what sort of results your work can achieve.

Gypsumtools stock professional drylining tools

We have been scouring the globe for the best dry lining tools and accessories there are for quite a good few years now. If you would like to find out more about the kind equipment we have in stock, you can take a look through our stock online or get in touch to find out more.